
UE 补完计划(五) UE中的STL-2
引言
这是个系列文章,会通过分析源码,从数据结构层面来分析UE4/UE5中的几种基本容器:TArray、TSparseArray、TBitArray、TSet、TMap、TMultiMap,并与传统实现方案进行比较。
本文基于的源码版本是UE5 release 5.0.0。不过源码与UE4对比过基本一致,可通用。
本文作为系列文章的第二篇,会分析TSet、TMap、TMultiMap的实现。
数据结构是程序员的基本功,因此本文不会赘述教科书上人尽皆知的概念,只会从UE4/UE5的基本容器的特色机制出发来分析其具体实现。
TSet
上一篇文章中,详细分析了TSparseArray的机制。TSparseArray在UE5的哈希结构(TSet、TMap)中,有着重要的应用,也是TSet的底层容器。
TSet的功能与std::set类似,用于查询某个元素是否已经位于set容器中。std::set使用红黑树来进行查询,并且由于红黑树的性质可以天然保证遍历的有序性。std::unordered_set则使用哈希表来实现,无法保证有序性。
而UE的TSet容器,不仅仅使用哈希表来进行查询来保证的查询效率,还能支持排序并且按顺序遍历!!这在很大程度上,也要归功于TSet使用的特殊设计。
TSet内部成员结构
我们先来看TSet内部的成员变量:
1 | // 为了方便注释,调整了一下声明顺序 |
Elements是一个数组,存储添加进哈希表的元素。这个数组存储的元素类型为:
1 | template<typename InElementType, bool bTypeLayout> |
而Hash也是一个数组,存储了每个元素的KeyHash所对应的在Elements数组中的索引。其核心数据类型如下(其实就一个Index):
1 | class FSetElementId |
从TSet的内部成员变量的结构可以分析出,其与传统的哈希表的结构有一个较大的不同,不是直接用哈希值查找元素,而是先查找索引,再根据索引来查找元素。
Find元素
其查找流程先用一个简要流程图来描述:

其核心流程全部在FindId()函数中。有一点需要注意的是:
Hash数组并不管哈希冲突。实际哈希冲突的处理放在Elements数组的元素中。
总体查找流程与传统的哈希表相似,计算哈希 -> 在哈希桶中找到元素 -> 遍历比较 -> 返回结果。
1 | FORCEINLINE FSetElementId& GetTypedHash(int32 HashIndex) const |
Add元素
添加元素会存在不同的情况:
-
如果元素已存在,那么替换元素
-
如果元素不存在,那么创建元素添加到
Elements中,并且将ElementId与HashKey进行连接存储到Hash中。
用简要流程图来描述如下:
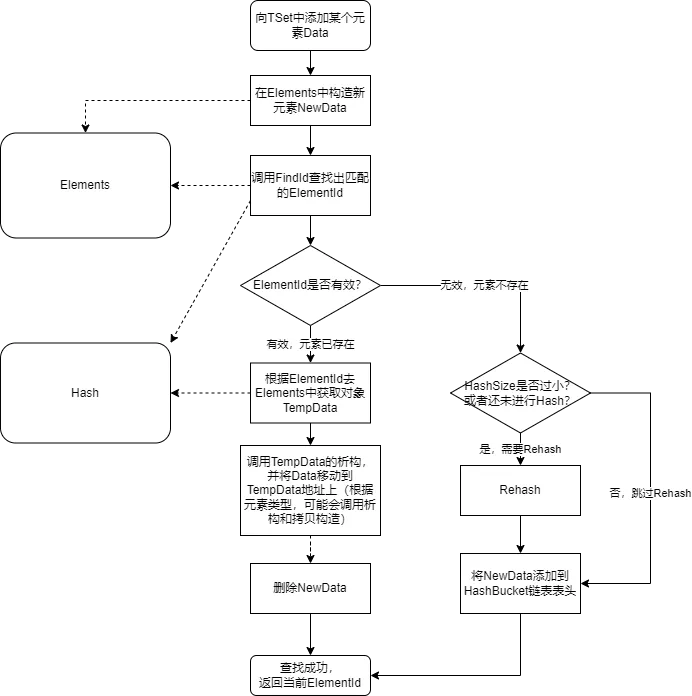
这里有两点可以注意:
-
入参使用了万能引用,意味着内部构造新对象时,可能使用拷贝构造,也可能使用移动构造。
-
内部实现即使是替换元素的分支,也会走先构造,再移动,再移除的逻辑。这个过程中,会走
Memmove的操作。
其核心流程在Emplace函数中:
1 | template <typename ArgsType> |
注意在上面的Emplace函数中,会直接在Elements数组中添加一个位置,并构造一个新元素。而如果走到了替换元素的分支,再走Move和删除的逻辑。
1 | bool TryReplaceExisting(uint32 KeyHash, SetElementType& Element, FSetElementId& InOutElementId, bool* bIsAlreadyInSetPtr) |
笔者在这里是有一些疑惑,理论上先FindExistingId,再根据其是否有效来决定是直接在原有地址上构造,还是构造新节点,这样是可以省去Memmove的开销的。可能考虑到代码复用的原因?
如果走到元素不存在的分支,那么代码很简单,就是将元素添加到HashBucket链表表头。
1 | FORCEINLINE void LinkElement(FSetElementId ElementId, const SetElementType& Element, uint32 KeyHash) const |
如何处理Hash冲突?
虽然TSet的哈希表结构使用了连续内存,但本质上还是一个开链法的哈希表。我们可以对传统开链法哈希表中的各实现做如下的转换:
| 传统开链法哈希表 | TSet |
|---|---|
| 堆 | Elements分配器 |
| 桶数组 | Hash数组 |
| 链表节点 | Elements内部元素 |
| 链表节点记录地址 | 链表节点记录索引 |
这样转换之后,我们会发现其实现依然是一个开链法的哈希表!
因此,其处理哈希冲突的方法也和传统开链法一致,如果发现哈希冲突,构造一个节点,并添加到链表表头即可。
Remove元素
由于使用了开链法,删除元素的处理就比开放定址法简单很多。只需要将节点从链表中移除即可。
1 | void Remove(FSetElementId ElementId) |
Rehash
任何哈希表的Rehash操作都是开销比较高的,TSet也不例外。Rehash流程需要清除Hash桶,并遍历所有的Elements,依次重新计算哈希,映射到Hash桶中。
Rehash目前只会在5种情况下调用:
-
添加元素时,需要的
HashSize比当前HashSize大 -
执行
Compact、Reserve等操作重新分配空间时。 -
排序之后。
-
当前空间过大,自动释放空间时
-
序列化之后,进行
TSet的初始化
其源码如下:
1 | /** Resizes the hash. */ |
TSet的遍历
前文已经分析过TSparseArray的遍历。TSet的遍历则直接包装了Elements数组的遍历,与HashBuckets没有关系。
TSet的迭代器内引用了一个TSparseArray的迭代器,迭代器的自增函数也仅仅是调用TSparseArray迭代器的自增,再返回TSparseArray迭代器的解引用所得值。
1 | FORCEINLINE TBaseIterator& operator++() |
TSet能保证Add的顺序与遍历顺序一致吗?
不能。本质上是因为TSparseArray由于有空闲链表,每次Add之后都会返回一个索引,而遍历时是根据下标从小到大遍历,自身就无法保证Add的顺序与其遍历顺序一致。
但是有一种特殊情况。由于TSparseArray的Reserve函数实现方式,在分配控件之后,空闲链表的可用索引是从下标0开始依次往后递增的。因此对于一个新的TSet,可以保证在没有触发Rehash之前,其遍历顺序与Add顺序一致。
TSet的排序
可能很多同学熟悉传统的哈希表之后,会对TSet表示惊奇,TSet居然可以排序??std::unordered_set也是哈希表,不都说是无序的吗?
实际上,传统哈希表无法进行排序的原因,是因为HashBuckets数组是由元素的哈希值来决定存放顺序的,元素有序并不意味着哈希值有序。如果想要排序的话怎么办呢?那就需要额外记录有序的元素的哈希值的顺序,遍历时读取这个有序哈希值数组,通过哈希值访问Value去进行遍历。
而你会发现,对于TSet的Elements与Hash分离的结构而言,天生就支持有序遍历!如果我们想要有序遍历TSet,只需要对Elements进行排序,然后进行一次Rehash,即可将“有序的元素的哈希值的顺序”记录在Element中。我们遍历时甚至不需要再通过哈希值去访问Value,而是直接遍历Elements数组即可。这样通过哈希值查找元素时,由于经历过Rehash,也不会影响添加、查找、删除等任何流程。
换种思路来说,传统哈希表无法进行有序遍历是因为在堆上申请内存是无序的。但是TSet的“堆”——Elements数组可以做到有序,这样就可以直接在“堆”上有序遍历元素。
排序代码如下:
1 | template <typename PREDICATE_CLASS> |
分析TSet的性能和内存优势
由于底层使用的是数组,且并未使用开链法,因此TSet的Elements排列非常紧密,能取得很高的内存占用率。另外排列紧密的另一个好处是对于缓存非常友好,能降低CacheMiss概率。使用链表法相比开放定址法,也降低了添加操作的耗时。另外,由于使用了TSparseArray,在TSet遍历时能取得较高的效率。
TMap
TMap作为UE5的字典结构,与TSet有着类似的功能,例如快速查找,添加、删除、更新健值对等。
利用TSet进行扩展
常见的使用set的结构来实现map的思想,就是将map的健值对组装成一个struct,这个struct使用其key来计算哈希,然后直接塞进set容器中即可。
例如一个简单的MapElement的实现如下:
1 | struct FMapElement |
TMap也采用了类似的思想,不过其使用了一个更通用的模板类:TTuple。
TTuple是UE自己实现的类似于std::tuple的模板类,用于承载UE自己的元祖相关的代码。TMap便采用了TTuple作为其MapElement类型。
1 | template <typename KeyType, typename ValueType> |
TTuple实现逻辑
TTuple是笔者在UE源码中见过的最复杂的模板元编程代码,没有之一。。这里尝试简单分析一下其实现原理和模板展开过程:
首先看TTuple类定义:
1 | template <typename... Types> |
这里上来就使用了TMakeIntegerSequence类。这是UE自己包装的IntegerSequence功能,底层也是直接桥接了编译器内置的__make_integer_seq。其作用是接收一个类型模板参数和一个数字N,会在编译期自动将N...转为生成0, 1, ..., N-1的模板代码。(可以参考C++14的std::make_integer_sequence功能)
例如这里我们传入的定义是:
1 | template <typename KeyType, typename ValueType> |
因此这里sizeof...(Types)就是2,因此TTupleBase<TMakeIntegerSequence<uint32, sizeof...(Types)>, Types...>这行代码,会自动展开生成:
1 | TTupleBase<TMakeIntegerSequence<uint32, 2>, KeyType, ValueType> |
我们可以找到TTupleBase的定义为:
1 | template <uint32... Indices, typename... Types> |
这里TIntegerSequence<uint32, Indices...>会接收TMakeIntegerSequence<uint32, 2>的参数,会展开为0和1来生成两份代码。注意这里变长模板形参展开在TTupleBaseElement<Types, Indices, sizeof...(Types)>外部,因此这里会进行多继承,并将每一个展开的类都作为自己的父类。因此这里会展开为:
1 | struct TTupleBase<TIntegerSequence<uint32, Indices...>/* 只是为了展开 */, KeyType, ValueType> : TTupleBaseElement<KeyType, 0, 2>, TTupleBaseElement<ValueType, 1, 2>` |
由于该struct并不包含虚函数,自身也没有数据,因此多继承的两个父类内部的数据会默认平铺的方式包含在该TTuple中。
而TTupleBaseElement只有两种实现:
1 | template <typename T, uint32 Index, uint32 TupleSize> |
即TTuple<KeyType, ValueType>和我们实现的FMapElement结构体在内存结构和用法上都是一样的!
根据TTuple获取KeyHash
这部分实现在类TDefaultMapKeyFuncs中。
1 | /** Defines how the map's pairs are hashed. */ |
既然TMap底层也使用了TSet,TSet拥有的功能TMap也都有,并且也能支持KeySort和ValueSort、按顺序遍历等操作。
分析TMap的性能和内存占用优势
性能方面,TMap由于组合使用了TSet,因此具有TSet的一切优点。除此之外,TPair类型的使用,使得Key和Value在内存上排列在一起,而TMap通过Key查找Value,或者遍历,都是非常常见的操作,Key和Value内存上紧密排列能大大提高缓存命中率,进而提升性能。
TMultiMap
TMap只支持一对一的查询,但是实际使用中往往需要一对多的查询(例如ObjectHash中使用了大量的MultiMap,来支持通过某个UClass查询其所有的UObject的龚梦)。这种情况要怎么办呢?
可能很容易想到的一种方案是嵌套,Key依然是Key,Value使用一个数组,类似于:TMap<KeyType, TArray<ValueType>>。这样功能确实没问题,但是会存在非常严重的性能开销和内存浪费。那UE直接实现了这种容器,它是怎么做的呢?
其实TMultiMap和TMap在定义上的差别,只有在ContainersFwd.h中定义时的差别:
1 | template<typename InKeyType, typename InValueType, typename SetAllocator = FDefaultSetAllocator, typename KeyFuncs = TDefaultMapHashableKeyFuncs<InKeyType, InValueType, false> > class TMap; |
注意,只有最后一个参数的true和false的差别!!
TMultiMap与TMap的差别
TDefaultMapHashableKeyFuncs在模板参数中有一个bInAllowDuplicateKeys,直接决定当前Map和Set是否允许重复的Key。这个参数的影响,其实只有三处会有差别:
-
在
TryReplacingExisting时,如果允许重复Key的话,即如果是MultiMap的话,将永远不会去替换已存在的元素,而是构造新元素添加至Bucket链表中。 -
在
RemoveImpl()实现中,如果不允许重复Key,那么在移除一个之后就会break,否则会重复移除所有匹配的元素。 -
在
TMapBase::GetKeys()中,如果不允许重复Key,会预先使用Reserve分配返回数组大小,否则不会预分配(因为无法知道Key的数量)。
TMultiMap类为自己专门提供了MultiFind的接口,使用这个接口可以获取所有与Key匹配的Values作为数组通过引用形参返回。
其实现则再简单不过,根据Key,遍历HashBucket中的所有元素,只要Key匹配成功,就塞到返回数组中即可。
1 | template<typename Allocator> void MultiFind(KeyInitType Key, TArray<ValueType, Allocator>& OutValues, bool bMaintainOrder = false) const |
总结
本文通过分析源码,简单介绍了TSet、TMap、TMultiMap几种UE常用容器的关键技术和实现原理。其实现既融合了传统数据结构的思想,并进行了优化,又融合了C++模板元编程的若干技巧。 至此,UE4/UE5的哈希表关联结构的容器就介绍完毕了。