前言
在上一篇中我们分析了 LayoutRebuilder 的实现,了解了一个 UI 元素是如何将自身注册到 LayoutSystem 中的。但 LayoutRebuilder 所做的事情仅仅是在 Rebuild 函数中调用 ILayoutElement 及 ILayoutController 接口来实现布局的更新,而真正的布局计算是由 LayoutElement 和 LayoutGroup 来完成的。
本篇将介绍 LayoutElement 和 LayoutGroup 的实现,关于这些布局组件的使用请参考 LayoutSystem
LayoutElement
LayoutElement 脚本用于控制 UI 元素的布局属性,包括最小宽高、首选宽高、弹性宽高等。通过添加该脚本,可以覆盖已有的布局属性,使 UI 的布局更加灵活。接下来让我们逐行分析 LayoutElement 的源码。
1
2
3
4
5
6
7
8
9
10
11
12
13
public class LayoutElement : UIBehaviour , ILayoutElement , ILayoutIgnorer { [SerializeField ] private bool m_IgnoreLayout = false ; [SerializeField ] private float m_MinWidth = -1 ; [SerializeField ] private float m_MinHeight = -1 ; [SerializeField ] private float m_PreferredWidth = -1 ; [SerializeField ] private float m_PreferredHeight = -1 ; [SerializeField ] private float m_FlexibleWidth = -1 ; [SerializeField ] private float m_FlexibleHeight = -1 ; [SerializeField ] private int m_LayoutPriority = 1 ; }
首先,可以看到 LayoutElement 继承自 UIBehaviour,实现了 ILayoutElement 和 ILayoutIgnorer 接口。ILayoutElement 接口定义了布局元素的属性,ILayoutIgnorer 接口用于控制是否忽略布局。
接口的实现方面,对于 ILayoutElement 接口,LayoutElement 实现了最小宽高、首选宽高、弹性宽高等属性。这些属性在 LayoutGroup 中会被用来计算布局。此外,CalculateLayoutInputHorizontal 和 CalculateLayoutInputVertical 函数均为空实现,这意味着 LayoutElement 的布局属性不需要计算,而是直接使用用户设置的值。
1
2
3
4
5
6
7
8
9
10
public virtual float minWidth { get { return m_MinWidth; } set { if (SetPropertyUtility.SetStruct(ref m_MinWidth, value )) SetDirty(); } }public virtual float minHeight { get { return m_MinHeight; } set { if (SetPropertyUtility.SetStruct(ref m_MinHeight, value )) SetDirty(); } }public virtual float preferredWidth { get { return m_PreferredWidth; } set { if (SetPropertyUtility.SetStruct(ref m_PreferredWidth, value )) SetDirty(); } }public virtual float preferredHeight { get { return m_PreferredHeight; } set { if (SetPropertyUtility.SetStruct(ref m_PreferredHeight, value )) SetDirty(); } }public virtual float flexibleWidth { get { return m_FlexibleWidth; } set { if (SetPropertyUtility.SetStruct(ref m_FlexibleWidth, value )) SetDirty(); } }public virtual float flexibleHeight { get { return m_FlexibleHeight; } set { if (SetPropertyUtility.SetStruct(ref m_FlexibleHeight, value )) SetDirty(); } }public virtual int layoutPriority { get { return m_LayoutPriority; } set { if (SetPropertyUtility.SetStruct(ref m_LayoutPriority, value )) SetDirty(); } }public virtual void CalculateLayoutInputHorizontal ()public virtual void CalculateLayoutInputVertical ()
对于 ILayoutIgnorer 接口,LayoutElement 实现了 ignoreLayout 属性,用于控制是否忽略布局。
1 public virtual bool ignoreLayout { get { return m_IgnoreLayout; } set { if (SetPropertyUtility.SetStruct(ref m_IgnoreLayout, value )) SetDirty(); } }
SetPropertyUtility
SetPropertyUtility 是一个工具类,用于设置不同类型的属性值,如果新值与旧值不同,则返回 true,否则返回 false。这样做的目的是为了避免重复设置相同的值,减少不必要的计算。
1
2
3
4
5
6
7
8
9
10
11
12
13
14
15
16
17
18
19
20
21
22
23
24
25
26
27
28
29
internal static class SetPropertyUtility { public static bool SetColor (ref Color currentValue, Color newValue { if (currentValue.r == newValue.r && currentValue.g == newValue.g && currentValue.b == newValue.b && currentValue.a == newValue.a) return false ; currentValue = newValue; return true ; } public static bool SetStruct <T >(ref T currentValue, T newValuewhere T : struct { if (EqualityComparer<T>.Default.Equals(currentValue, newValue)) return false ; currentValue = newValue; return true ; } public static bool SetClass <T >(ref T currentValue, T newValuewhere T : class { if ((currentValue == null && newValue == null ) || (currentValue != null && currentValue.Equals(newValue))) return false ; currentValue = newValue; return true ; } }
可以看出,SetPropertyUtility 分别针对 Color、struct 和 class 类型的属性提供了不同的设置方法。值得注意的是 SetStruct 与 SetClass 方法,它们分别用于值类型和引用类型的属性设置,关于 C# 中的值类型和引用类型可以参考 C# 值类型和引用类型 。
值类型的比较是通过 EqualityComparer<T>.Default.Equals 方法实现的,而引用类型的比较则是通过类内部的 Equals 方法实现的。这里的 Equals 方法是由 object 类提供的虚方法,可以被子类重写,用于比较两个对象是否相等。
SetDirty
SetDirty 函数用于标记布局元素需要重新计算布局,这里实际上是一种 “脏标记” 的设计模式,被标记的元素会被添加到布局系统的更新队列中,等待下一次的布局计算而不是立刻更新。
1 2 3 4 5 6 7 8 9 10 11 12 13 protected void SetDirty (){ if (!IsActive()) return ; LayoutRebuilder.MarkLayoutForRebuild(transform as RectTransform); }
其他
LayoutElement 还实现了一些在 UIBehaviour 中的生命周期函数,逻辑几乎都是调用 SetDirty 函数,用于触发一次布局更新。
1
2
3
4
5
6
7
8
9
10
11
12
13
14
15
16
17
18
19
20
21
22
23
24
25
26
protected override void OnEnable (){ base .OnEnable(); SetDirty(); } protected override void OnTransformParentChanged (){ SetDirty(); } protected override void OnDisable (){ SetDirty(); base .OnDisable(); } protected override void OnDidApplyAnimationProperties (){ SetDirty(); } protected override void OnBeforeTransformParentChanged (){ SetDirty(); }
LayoutGroup
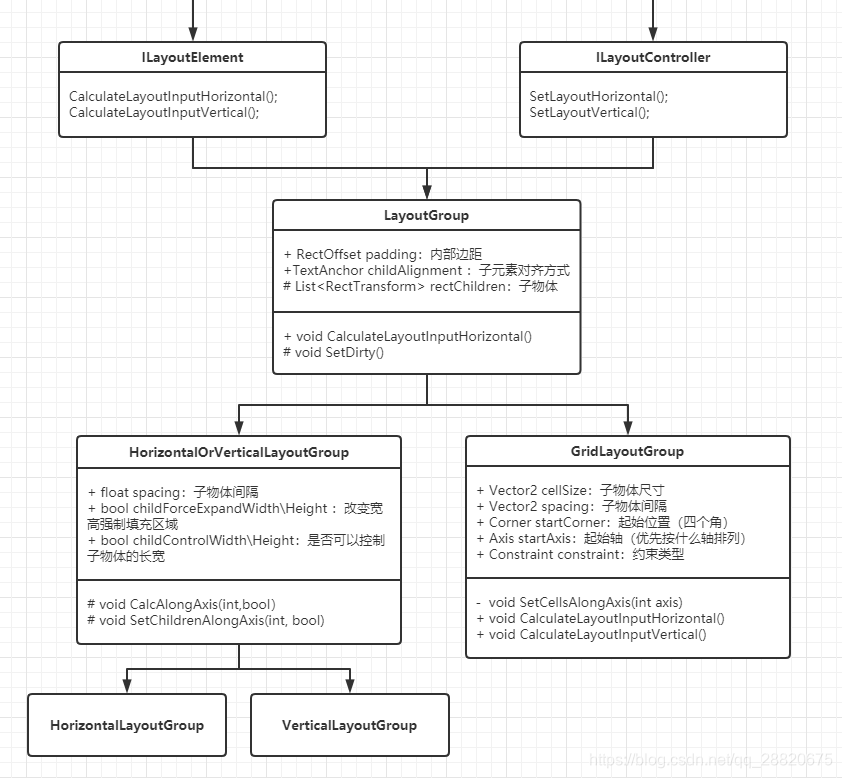
LayoutGroup 是一个抽象类,用于控制子物体的布局。LayoutGroup 会根据布局属性来计算子物体的大小和位置。LayoutGroup 有三个子类:HorizontalLayoutGroup、VerticalLayoutGroup 和 GridLayoutGroup,分别用于水平布局、垂直布局和网格布局。
LayoutGroup 的类图如下:
让我们逐一分析。
LayoutGroup
LayoutGroup 是所有布局组件的基类,继承自 UIBehaviour,实现了 ILayoutElement 和 ILayoutController 接口。
成员属性
LayoutGroup 定义了一些布局属性,包括填充、布局方向等。这些属性会影响子物体的布局。
1
2
3
4
5
6
7
8
public abstract class LayoutGroup : UIBehaviour , ILayoutElement , ILayoutGroup { [SerializeField ] protected RectOffset m_Padding = new RectOffset(); public RectOffset padding { get { return m_Padding; } set { SetProperty(ref m_Padding, value ); } } [SerializeField ] protected TextAnchor m_ChildAlignment = TextAnchor.UpperLeft; public TextAnchor childAlignment { get { return m_ChildAlignment; } set { SetProperty(ref m_ChildAlignment, value ); } } }
上述的属性在各种布局组件中都有所体现。
1 2 3 4 5 6 7 8 9 10 11 12 13 14 15 16 [System.NonSerialized ] private RectTransform m_Rect; protected RectTransform rectTransform{ get { if (m_Rect == null ) m_Rect = GetComponent<RectTransform>(); return m_Rect; } } protected DrivenRectTransformTracker m_Tracker;private Vector2 m_TotalMinSize = Vector2.zero;private Vector2 m_TotalPreferredSize = Vector2.zero;private Vector2 m_TotalFlexibleSize = Vector2.zero;
此外,LayoutGroup 还维护了自身的 RectTransform、DrivenRectTransformTracker 和布局计算所需的 min、preferred、flexible 大小。
需要注意的是 DrivenRectTransformTracker,在 Unity 官方文档 中可以得知:
DrivenRectTransformTracker 结构用于指定其正在驱动的 RectTransform。
驱动 RectTransform 意味着被驱动 RectTransform 的值由该组件控制。这些被驱动的值无法在 Inspector 中加以编辑(它们显示为已禁用)。此外在保存场景时也不会保存它们,这可防止不需要的场景文件更改。
无论何时该组件正在更改被驱动 RectTransform 的值,其都应首先调用 Clear 方法,然后使用 Add 方法来添加其正在驱动的所有 RectTransform。此外还应在该组件的 OnDisable 回调中调用 Clear 方法。
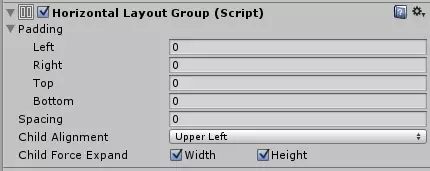
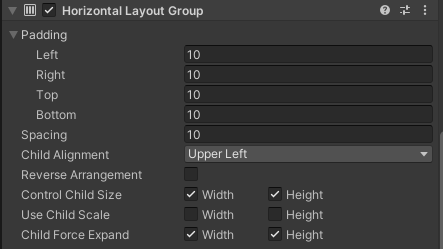
总体而言就是实现下图的效果:
还有一些用于用于返回布局属性的函数,值得注意的是 layoutPriority 的返回值被指定为 0。
1 2 3 4 5 6 7 8 9 10 11 12 13 14 15 16 17 18 19 20 21 22 23 24 25 26 27 28 29 30 31 32 33 34 public virtual float minWidth { get { return GetTotalMinSize(0 ); } }public virtual float preferredWidth { get { return GetTotalPreferredSize(0 ); } }public virtual float flexibleWidth { get { return GetTotalFlexibleSize(0 ); } }public virtual float minHeight { get { return GetTotalMinSize(1 ); } }public virtual float preferredHeight { get { return GetTotalPreferredSize(1 ); } }public virtual float flexibleHeight { get { return GetTotalFlexibleSize(1 ); } }public virtual int layoutPriority { get { return 0 ; } }
生命周期相关函数
与 LayoutElement 类似,LayoutGroup 也实现了一些生命周期相关函数,用于触发布局更新。不同之处在于,LayoutGroup 的 SetDirty 函数会根据当前的 CanvasUpdateRegistry 状态来决定是否需要将布局延迟到下一帧。
也正是因此,在 OnDisable 函数中才不能直接调用 SetDirty 函数,因为无需等待下一帧。且可以发现,OnDisable 函数中的确将 m_Tracker 做了清空操作。
1
2
3
4
5
6
7
8
9
10
11
12
13
14
15
16
17
18
19
20
21
22
23
24
25
26
27
28
29
30
31
32
33
34
35
36
37
protected override void OnEnable (){ base .OnEnable(); SetDirty(); } protected override void OnDisable (){ m_Tracker.Clear(); LayoutRebuilder.MarkLayoutForRebuild(rectTransform); base .OnDisable(); } protected override void OnDidApplyAnimationProperties (){ SetDirty(); } protected void SetDirty (){ if (!IsActive()) return ; if (!CanvasUpdateRegistry.IsRebuildingLayout()) LayoutRebuilder.MarkLayoutForRebuild(rectTransform); else StartCoroutine(DelayedSetDirty(rectTransform)); } IEnumerator DelayedSetDirty (RectTransform rectTransform ) { yield return null ; LayoutRebuilder.MarkLayoutForRebuild(rectTransform); }
ILayoutElement 接口实现
LayoutGroup 实现了 ILayoutElement 接口,用于更新布局属性,为接下来的布局设置提供数据。具体实现如下:
1 2 3 4 5 6 7 8 9 10 11 12 13 14 15 16 17 18 19 20 21 22 23 24 25 26 27 28 29 30 31 32 33 34 35 36 37 [System.NonSerialized ] private List<RectTransform> m_RectChildren = new List<RectTransform>(); protected List<RectTransform> rectChildren { get { return m_RectChildren; } }public virtual void CalculateLayoutInputHorizontal (){ m_RectChildren.Clear(); var toIgnoreList = ListPool<Component>.Get(); for (int i = 0 ; i < rectTransform.childCount; i++) { var rect = rectTransform.GetChild(i) as RectTransform; if (rect == null || !rect.gameObject.activeInHierarchy) continue ; rect.GetComponents(typeof (ILayoutIgnorer), toIgnoreList); if (toIgnoreList.Count == 0 ) { m_RectChildren.Add(rect); continue ; } for (int j = 0 ; j < toIgnoreList.Count; j++) { var ignorer = (ILayoutIgnorer)toIgnoreList[j]; if (!ignorer.ignoreLayout) { m_RectChildren.Add(rect); break ; } } } ListPool<Component>.Release(toIgnoreList); m_Tracker.Clear(); } public abstract void CalculateLayoutInputVertical ()
在 CalculateLayoutInputHorizontal 函数中,会收集所有需要布局的子物体,并将其保存在 m_RectChildren 中。有几点需要注意:
如 Unity 文档所言,在设置子物体的布局(即驱动 RectTransform)之前,的确调用了 m_Tracker.Clear() 方法以清空上一轮的布局设置。
对于 ILayoutIgnorer 的处理逻辑为:只有当子物体上所有实现了 ILayoutIgnorer 接口的组件都设置了 ignoreLayout 为 true 时,才会忽略该子物体的布局 。否则会正常布局该子物体。
由于 LayoutRebuilder 的处理顺序为先水平布局再垂直布局,而此处计算布局的逻辑和方向无关,只是收集子物体。因此只实现了 CalculateLayoutInputHorizontal 函数,CalculateLayoutInputVertical 函数为空实现。
布局设置相关函数
虽然 LayoutGroup 实现了 ILayoutController 接口,但 SetLayoutHorizontal 和 SetLayoutVertical 函数均为空实现。LayoutGroup 仅实现了布局设置的一些通用功能函数。
GetStartOffset
GetStartOffset 函数用于计算子物体在给定轴上的起始位置。
1 2 3 4 5 6 7 8 9 10 11 12 13 14 15 16 17 18 19 20 21 22 23 24 25 26 27 protected float GetStartOffset (int axis, float requiredSpaceWithoutPadding{ float requiredSpace = requiredSpaceWithoutPadding + (axis == 0 ? padding.horizontal : padding.vertical); float availableSpace = rectTransform.rect.size[axis]; float surplusSpace = availableSpace - requiredSpace; float alignmentOnAxis = GetAlignmentOnAxis(axis); return (axis == 0 ? padding.left : padding.top) + surplusSpace * alignmentOnAxis; } protected float GetAlignmentOnAxis (int axis{ if (axis == 0 ) return ((int )childAlignment % 3 ) * 0.5f ; else return ((int )childAlignment / 3 ) * 0.5f ; }
其中,alignmentOnAxis 是一个值为 0、0.5、1 的浮点数,用于表示子物体在给定轴上的对齐方式。GetAlignmentOnAxis 函数用于计算该值,实现得十分巧妙。
ChildAlignment 是一个 TextAnchor 类型的枚举,定义如下:
1
2
3
4
5
6
7
8
9
10
11
12
public enum TextAnchor{ UpperLeft, UpperCenter, UpperRight, MiddleLeft, MiddleCenter, MiddleRight, LowerLeft, LowerCenter, LowerRight }
通过取余和取整操作,可以将 TextAnchor 转换为 alignmentOnAxis 的值,并用于计算子物体的起始位置。
SetLayoutInputForAxis
SetLayoutInputForAxis 用于更新布局属性,包括最小宽高、首选宽高、弹性宽高等。
1
2
3
4
5
6
protected void SetLayoutInputForAxis (float totalMin, float totalPreferred, float totalFlexible, int axis{ m_TotalMinSize[axis] = totalMin; m_TotalPreferredSize[axis] = totalPreferred; m_TotalFlexibleSize[axis] = totalFlexible; }
SetChildAlongAxis
SetChildAlongAxis 用于设置子物体在给定轴上的位置和大小,包括了两个重载版本,第二个版本可以额外接收一个 size 参数,用于设置子物体的大小,适用于需要改变子物体大小的情况。
1
2
3
4
5
6
7
8
9
10
11
12
13
14
15
16
17
18
19
20
21
22
23
24
25
protected void SetChildAlongAxis (RectTransform rect, int axis, float pos ){ if (rect == null ) return ; SetChildAlongAxisWithScale(rect, axis, pos, 1.0f ); } protected void SetChildAlongAxisWithScale (RectTransform rect, int axis, float pos, float scaleFactor ){ if (rect == null ) return ; m_Tracker.Add(this , rect, DrivenTransformProperties.Anchors | (axis == 0 ? DrivenTransformProperties.AnchoredPositionX : DrivenTransformProperties.AnchoredPositionY)); rect.anchorMin = Vector2.up; rect.anchorMax = Vector2.up; Vector2 anchoredPosition = rect.anchoredPosition; anchoredPosition[axis] = (axis == 0 ) ? (pos + rect.sizeDelta[axis] * rect.pivot[axis] * scaleFactor) : (-pos - rect.sizeDelta[axis] * (1f - rect.pivot[axis]) * scaleFactor); rect.anchoredPosition = anchoredPosition; }
可以看出,在 SetChildAlongAxisWithScale 中,会将该子物体的 RectTransform 添加到 m_Tracker 中,表示该子物体的位置和大小由当前布局组件控制。然后根据传入的值设置子物体的位置和大小。但在 SetChildAlongAxis 中,scaleFactor 被固定为 1.0,因此只对子物体有移动的效果。
1
2
3
4
5
6
7
8
9
10
11
12
13
14
15
16
17
18
19
20
21
22
23
24
25
26
27
28
29
30
31
32
33
protected void SetChildAlongAxis (RectTransform rect, int axis, float pos, float size ){ if (rect == null ) return ; SetChildAlongAxisWithScale(rect, axis, pos, size, 1.0f ); } protected void SetChildAlongAxisWithScale (RectTransform rect, int axis, float pos, float size, float scaleFactor ){ if (rect == null ) return ; m_Tracker.Add(this , rect, DrivenTransformProperties.Anchors | (axis == 0 ? (DrivenTransformProperties.AnchoredPositionX | DrivenTransformProperties.SizeDeltaX) : (DrivenTransformProperties.AnchoredPositionY | DrivenTransformProperties.SizeDeltaY) ) ); rect.anchorMin = Vector2.up; rect.anchorMax = Vector2.up; Vector2 sizeDelta = rect.sizeDelta; sizeDelta[axis] = size; rect.sizeDelta = sizeDelta; Vector2 anchoredPosition = rect.anchoredPosition; anchoredPosition[axis] = (axis == 0 ) ? (pos + size * rect.pivot[axis] * scaleFactor) : (-pos - size * (1f - rect.pivot[axis]) * scaleFactor); rect.anchoredPosition = anchoredPosition; }
在第二个版本的重载中,除了设置 rect.anchoredPosition 外,还设置了 rect.sizeDelta,用于改变子物体的大小。
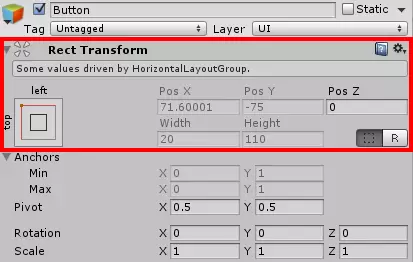
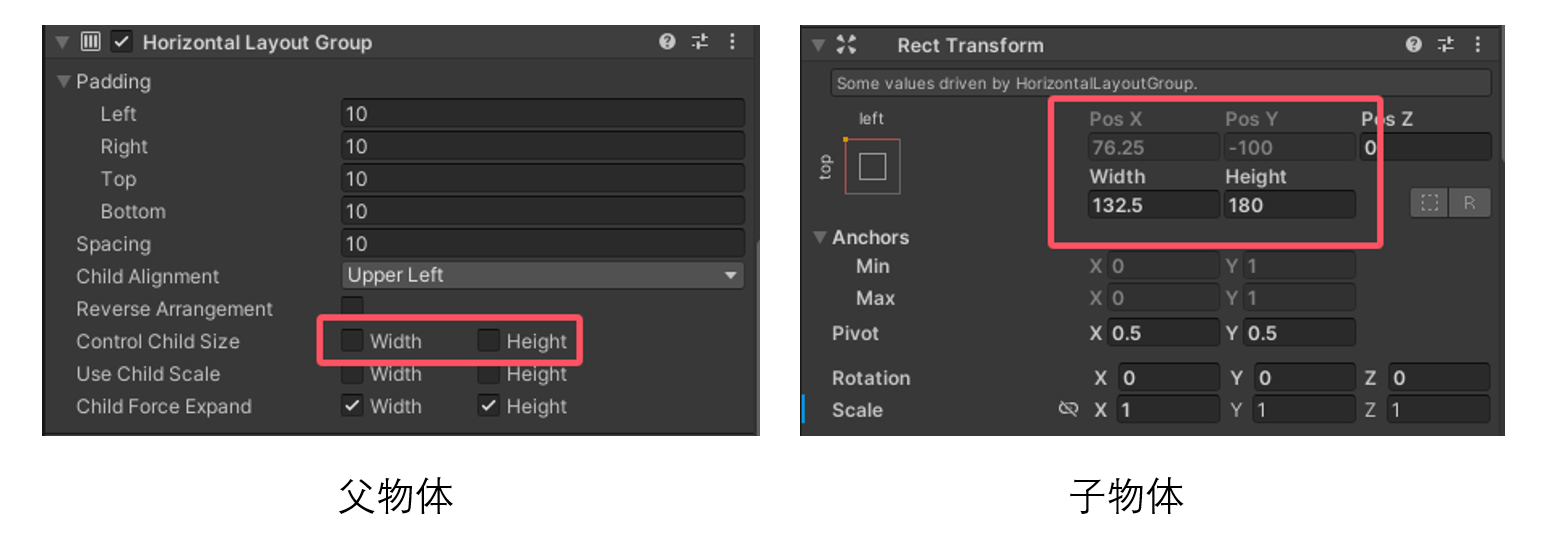
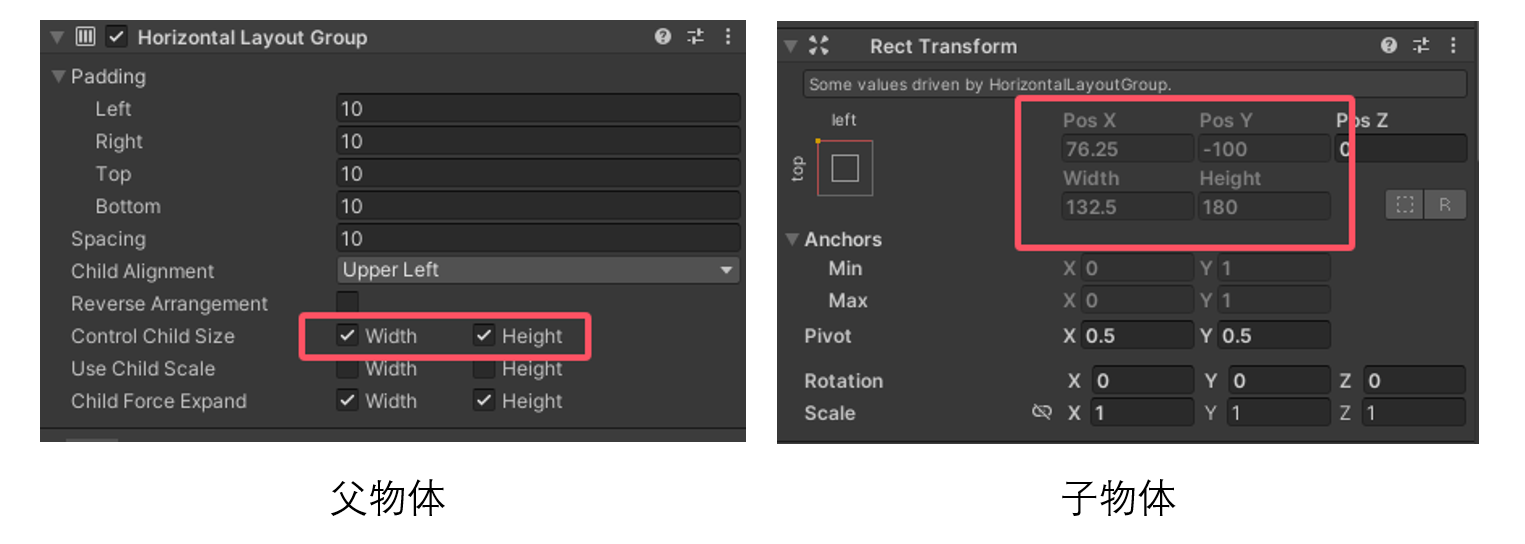
两个重载函数的 m_Tracker 设置并不相同,代表了子物体被布局组件控制的程度不同,以一个例子来说明:
当父物体的 HorizontalLayoutGroup 不勾选 Control Child Size 时,子物体虽然 PosX 与 PosY 均被布局组件控制,但 Width 与 Height 仍然由子物体自身控制。此时在设置布局时,调用的就是没有 size 参数的 SetChildAlongAxisWithScale 函数。
当父物体的 HorizontalLayoutGroup 勾选 Control Child Size 时,子物体的 Width 与 Height 也被布局组件控制。在设置布局时,调用的就是有 size 参数的 SetChildAlongAxisWithScale 函数。
SetProperty
SetProperty 函数用于设置布局属性,如果新值与旧值不同,则返回 true,否则返回 false。这里的 SetProperty 函数与 SetPropertyUtility 类似,用于避免重复设置相同的值。
1
2
3
4
5
6
7
protected void SetProperty <T >(ref T currentValue, T newValue{ if ((currentValue == null && newValue == null ) || (currentValue != null && currentValue.Equals(newValue))) return ; currentValue = newValue; SetDirty(); }
在设置完布局属性后,会调用 SetDirty 函数,标记布局组件需要重新计算布局。感觉这一部分的逻辑设计有些冗余,SetProperty 函数的逻辑与 SetPropertyUtility 函数的逻辑几乎一致,但这里似乎是为了更广泛的泛型考虑以及 SetDirty 函数的调用。
小结
LayoutGroup 是所有布局组件的基类,实现了一些布局设置的通用功能函数,如 CalculateLayoutInputHorizontal 用于收集子物体,SetLayoutInputForAxis 用于更新布局属性,SetChildAlongAxis 用于设置子物体的位置和大小。LayoutGroup 的子类会使用这些函数并真正地实现 SetLayoutHorizontal 和 SetLayoutVertical 接口,用以实现具体的布局逻辑。
LayoutUtility
LayoutUtility 是一个工具类,用于获取给定 RectTransform 的布局属性,与直接访问 ILayoutElement 接口相比,LayoutUtility 提供了更多数值上的处理,此外还处理了一个 RectTransform 上有多个 ILayoutElement 组件的情况。
GetLayoutProperty
GetLayoutProperty 函数用于获取给定 RectTransform 的布局属性,函数内会处理多个 ILayoutElement 组件的情况,当一个 RectTransform 上有多个 ILayoutElement 组件时,会返回 LayoutPriority 最高的组件中最大的属性 。
1
2
3
4
5
6
7
8
9
10
11
12
13
14
15
16
17
18
19
20
21
22
23
24
25
26
27
28
29
30
31
32
33
34
35
36
37
38
39
40
41
42
43
44
45
46
public static float GetLayoutProperty (RectTransform rect, System.Func<ILayoutElement, float > property, float defaultValue, out ILayoutElement source ){ source = null ; if (rect == null ) return 0 ; float min = defaultValue; int maxPriority = System.Int32.MinValue; var components = ListPool<Component>.Get(); rect.GetComponents(typeof (ILayoutElement), components); for (int i = 0 ; i < components.Count; i++) { var layoutComp = components[i] as ILayoutElement; if (layoutComp is Behaviour && !((Behaviour)layoutComp).isActiveAndEnabled) continue ; int priority = layoutComp.layoutPriority; if (priority < maxPriority) continue ; float prop = property(layoutComp); if (prop < 0 ) continue ; if (priority > maxPriority) { min = prop; maxPriority = priority; source = layoutComp; } else if (prop > min) { min = prop; source = layoutComp; } } ListPool<Component>.Release(components); return min; }
首先,可以由函数签名看到,GetLayoutProperty 实际上可以获取任意属性,只需要传入一个 Func<ILayoutElement, float> 类型的委托即可。其次,函数内部会遍历 RectTransform 上的所有 ILayoutElement 组件,找到 LayoutPriority 最高的组件中最大的属性值。
需要注意的是,这里会直接忽略属性值小于 0 的组件,当一个组件的 minSize 等属性设置为负数时,表示忽略该组件的布局。
1
2
3
4
5
public static float GetLayoutProperty (RectTransform rect, System.Func<ILayoutElement, float > property, float defaultValue ){ ILayoutElement dummy; return GetLayoutProperty(rect, property, defaultValue, out dummy); }
该函数还有一个重载版本,用于获取给定 RectTransform 的布局属性,但不需要输出 ILayoutElement 组件。
其他函数
LayoutUtility 向外提供的其他静态函数全都基于 GetLayoutProperty 实现,如 GetMinSize、GetPreferredSize、GetFlexibleSize 等。
1
2
3
4
5
6
7
8
9
10
11
12
13
14
15
16
public static float GetMinSize (RectTransform rect, int axis ){ if (axis == 0 ) return GetMinWidth(rect); return GetMinHeight(rect); } public static float GetMinWidth (RectTransform rect ){ return GetLayoutProperty(rect, e => e.minWidth, 0 ); } public static float GetMinHeight (RectTransform rect ){ return GetLayoutProperty(rect, e => e.minHeight, 0 ); }
可以看到全部属性的默认返回值均被设置为 0,即不会占据布局控件。
此外,在获取 PreferredSize 时,做了一些特殊处理:
1
2
3
4
public static float GetPreferredWidth (RectTransform rect ){ return Mathf.Max(GetLayoutProperty(rect, e => e.minWidth, 0 ), GetLayoutProperty(rect, e => e.preferredWidth, 0 )); }
该函数并不会直接返回 preferredWidth,而是返回 minWidth 与 preferredWidth 中的最大值 。
HorizontalOrVerticalLayoutGroup
HorizontalOrVerticalLayoutGroup 是 LayoutGroup 的子类,用于实现水平和垂直布局。在类中实现了两个重要的函数: CalcAlongAxis 和 SetChildrenAlongAxis 用于在不同的轴上计算和设置子物体的位置与大小。派生自该类的 HorizontalLayoutGroup 和 VerticalLayoutGroup 只需要以不同的方式调用这两个函数即可实现水平和垂直布局。
从代码结构的角度思考,在 LayoutGroup 与具体的 xxxLayoutGroup 之间再增加一层抽象层是一种很好的设计,这样可以将更多可复用的逻辑放在 HorizontalOrVerticalLayoutGroup 中,避免了大量的冗余代码,且具备了更好的可维护性与可扩展性。
布局属性
HorizontalOrVerticalLayoutGroup 提供了一系列的可配置属性,用于规定布局时的行为,这些属性在 LayoutSystem 的使用 中有详细介绍。
1
2
3
4
5
6
7
8
9
10
11
12
13
14
15
16
17
18
19
20
21
22
23
24
25
public abstract class HorizontalOrVerticalLayoutGroup : LayoutGroup { [SerializeField ] protected float m_Spacing = 0 ; public float spacing { get { return m_Spacing; } set { SetProperty(ref m_Spacing, value ); } } [SerializeField ] protected bool m_ChildForceExpandWidth = true ; public bool childForceExpandWidth { get { return m_ChildForceExpandWidth; } set { SetProperty(ref m_ChildForceExpandWidth, value ); } } [SerializeField ] protected bool m_ChildForceExpandHeight = true ; public bool childForceExpandHeight { get { return m_ChildForceExpandHeight; } set { SetProperty(ref m_ChildForceExpandHeight, value ); } } [SerializeField ] protected bool m_ChildControlWidth = true ; public bool childControlWidth { get { return m_ChildControlWidth; } set { SetProperty(ref m_ChildControlWidth, value ); } } [SerializeField ] protected bool m_ChildControlHeight = true ; public bool childControlHeight { get { return m_ChildControlHeight; } set { SetProperty(ref m_ChildControlHeight, value ); } } [SerializeField ] protected bool m_ChildScaleWidth = false ; public bool childScaleWidth { get { return m_ChildScaleWidth; } set { SetProperty(ref m_ChildScaleWidth, value ); } } [SerializeField ] protected bool m_ChildScaleHeight = false ; public bool childScaleHeight { get { return m_ChildScaleHeight; } set { SetProperty(ref m_ChildScaleHeight, value ); } } }
CalcAlongAxis
CalcAlongAxis 函数用于遍历子物体并计算在指定轴上 LayoutGroup 本身的 min、preferred、flexible 大小。
先说结论,CalcAlongAxis 函数的处理逻辑为:当要计算的轴与布局方向一致时,会将子物体的 min、preferred、flexible 大小累加,当要计算的轴与布局方向不一致时,会将子物体的 min、preferred、flexible 大小取最大值;最后会调用 SetLayoutInputForAxis 函数更新布局属性。
点击展开代码
1
2
3
4
5
6
7
8
9
10
11
12
13
14
15
16
17
18
19
20
21
22
23
24
25
26
27
28
29
30
31
32
33
34
35
36
37
38
39
40
41
42
43
44
45
46
47
48
49
50
protected void CalcAlongAxis (int axis, bool isVertical{ float combinedPadding = (axis == 0 ? padding.horizontal : padding.vertical); bool controlSize = (axis == 0 ? m_ChildControlWidth : m_ChildControlHeight); bool useScale = (axis == 0 ? m_ChildScaleWidth : m_ChildScaleHeight); bool childForceExpandSize = (axis == 0 ? m_ChildForceExpandWidth : m_ChildForceExpandHeight); float totalMin = combinedPadding; float totalPreferred = combinedPadding; float totalFlexible = 0 ; bool alongOtherAxis = (isVertical ^ (axis == 1 )); for (int i = 0 ; i < rectChildren.Count; i++) { RectTransform child = rectChildren[i]; float min, preferred, flexible; GetChildSizes(child, axis, controlSize, childForceExpandSize, out min, out preferred, out flexible); if (useScale) { float scaleFactor = child.localScale[axis]; min *= scaleFactor; preferred *= scaleFactor; flexible *= scaleFactor; } if (alongOtherAxis) { totalMin = Mathf.Max(min + combinedPadding, totalMin); totalPreferred = Mathf.Max(preferred + combinedPadding, totalPreferred); totalFlexible = Mathf.Max(flexible, totalFlexible); } else { totalMin += min + spacing; totalPreferred += preferred + spacing; totalFlexible += flexible; } } if (!alongOtherAxis && rectChildren.Count > 0 ) { totalMin -= spacing; totalPreferred -= spacing; } totalPreferred = Mathf.Max(totalMin, totalPreferred); SetLayoutInputForAxis(totalMin, totalPreferred, totalFlexible, axis); }
接下来我们逐行分析:
1
2
3
4
5
6
7
8
9
10
11
12
13
14
15
protected void CalcAlongAxis (int axis, bool isVertical{ float combinedPadding = (axis == 0 ? padding.horizontal : padding.vertical); bool controlSize = (axis == 0 ? m_ChildControlWidth : m_ChildControlHeight); bool useScale = (axis == 0 ? m_ChildScaleWidth : m_ChildScaleHeight); bool childForceExpandSize = (axis == 0 ? m_ChildForceExpandWidth : m_ChildForceExpandHeight); float totalMin = combinedPadding; float totalPreferred = combinedPadding; float totalFlexible = 0 ; bool alongOtherAxis = (isVertical ^ (axis == 1 )); }
首先,根据 axis 和 isVertical 参数,确定了一些布局属性,并且定义了 totalMin、totalPreferred 和 totalFlexible 三个变量,用于保存布局组件的 min、preferred 和 flexible 大小。
比较有意思的是 alongOtherAxis 变量,该变量的含义是当前的计算方向与布局方向是否一致。这里使用了异或运算符 ^,由于 axis 为 0 时代表水平方向,为 1 时代表垂直方向,因此 isVertical ^ (axis == 1) 即能判断当前的计算方向是否与布局方向一致。
1
2
3
4
5
6
7
8
9
10
11
12
13
14
15
16
17
18
19
20
21
22
23
24
25
26
27
28
29
for (int i = 0 ; i < rectChildren.Count; i++){ RectTransform child = rectChildren[i]; float min, preferred, flexible; GetChildSizes(child, axis, controlSize, childForceExpandSize, out min, out preferred, out flexible); if (useScale) { float scaleFactor = child.localScale[axis]; min *= scaleFactor; preferred *= scaleFactor; flexible *= scaleFactor; } if (alongOtherAxis) { totalMin = Mathf.Max(min + combinedPadding, totalMin); totalPreferred = Mathf.Max(preferred + combinedPadding, totalPreferred); totalFlexible = Mathf.Max(flexible, totalFlexible); } else { totalMin += min + spacing; totalPreferred += preferred + spacing; totalFlexible += flexible; } }
不知道大家是否还记得 rectChildren 是何时被收集的?答案就是 LayoutGroup.CalculateLayoutInputHorizontal 函数。
接下来,会遍历所有的子物体,首先获取子物体的 min、preferred、flexible 大小,然后根据 useScale 变量,判断是否需要乘以子物体的缩放比例。
然后,根据计算轴是否与布局方向一致,分别计算 totalMin、totalPreferred 和 totalFlexible 的值。当计算轴与布局方向不一致时,会取子物体中对应属性的最大值,否则会将子物体的 min、preferred、flexible 大小累加,这里还额外计算了 spacing 的值。
1
2
3
4
5
6
7
if (!alongOtherAxis && rectChildren.Count > 0 ){ totalMin -= spacing; totalPreferred -= spacing; } totalPreferred = Mathf.Max(totalMin, totalPreferred); SetLayoutInputForAxis(totalMin, totalPreferred, totalFlexible, axis);
随后会减去多计算的一次 spacing,并将 totalPreferred 的值设置为 totalMin 与 totalPreferred 中的最大值。最后,调用 LayoutGroup.SetLayoutInputForAxis 函数更新布局属性。
1
2
3
4
5
6
7
8
9
10
11
12
13
14
15
16
17
18
19
private void GetChildSizes (RectTransform child, int axis, bool controlSize, bool childForceExpand, out float min, out float preferred, out float flexible ){ if (!controlSize) { min = child.sizeDelta[axis]; preferred = min; flexible = 0 ; } else { min = LayoutUtility.GetMinSize(child, axis); preferred = LayoutUtility.GetPreferredSize(child, axis); flexible = LayoutUtility.GetFlexibleSize(child, axis); } if (childForceExpand) flexible = Mathf.Max(flexible, 1 ); }
看一下 GetChildSizes 函数的实现,该函数用于获取子物体的 min、preferred、flexible 大小。其中,controlSize 参数用于标识子物体的大小是否由布局组件控制,childForceExpand 参数用于标识子物体是否强制扩展大小。
如果子物体的大小不由布局组件控制,那么 min、preferred 大小均为子物体的 sizeDelta,flexible 大小为 0。否则,分别调用 LayoutUtility 中的对应函数获取子物体的大小。
这里需要注意,当强制扩展大小时,flexible 大小会取 flexible 与 1 中的最大值,即至少为 1。因此,小于 1 的 flexible 作用与 1 相同 。这点在我们制作 UI 时要尤为注意。
SetChildrenAlongAxis
SetChildrenAlongAxis 函数用于设置子物体在指定轴上的位置和大小,这个函数还是挺长的,这里就不放完整代码了,让我们直接一步步地分析。
1
2
3
4
5
6
7
float size = rectTransform.rect.size[axis];bool controlSize = (axis == 0 ? m_ChildControlWidth : m_ChildControlHeight);bool useScale = (axis == 0 ? m_ChildScaleWidth : m_ChildScaleHeight);bool childForceExpandSize = (axis == 0 ? m_ChildForceExpandWidth : m_ChildForceExpandHeight);float alignmentOnAxis = GetAlignmentOnAxis(axis);bool alongOtherAxis = (isVertical ^ (axis == 1 ));
首先还是一些布局属性的获取,不知道大家是否还记得 GetAlignmentOnAxis,该函数定义在 LayoutGroup 中,返回值是一个 0、0.5、1 的浮点数,用于计算子物体的起始位置。
沿着其他轴排列
函数还是根据 alongOtherAxis 分为了两部分逻辑,先来看简单的沿着其他轴的情况:
1
2
3
4
5
6
7
8
9
10
11
12
13
14
15
16
17
18
19
20
float innerSize = size - (axis == 0 ? padding.horizontal : padding.vertical);for (int i = 0 ; i < rectChildren.Count; i++){ RectTransform child = rectChildren[i]; float min, preferred, flexible; GetChildSizes(child, axis, controlSize, childForceExpandSize, out min, out preferred, out flexible); float scaleFactor = useScale ? child.localScale[axis] : 1f ; float requiredSpace = Mathf.Clamp(innerSize, min, flexible > 0 ? size : preferred); float startOffset = GetStartOffset(axis, requiredSpace * scaleFactor); if (controlSize) { SetChildAlongAxisWithScale(child, axis, startOffset, requiredSpace, scaleFactor); } else { float offsetInCell = (requiredSpace - child.sizeDelta[axis]) * alignmentOnAxis; SetChildAlongAxisWithScale(child, axis, startOffset + offsetInCell, scaleFactor); } }
当沿着其他轴排列时,布局的设置就比较简单了,无需考虑其他子物体的位置,只需要根据布局属性设置子物体的位置和大小即可。这里会根据 controlSize 的值,分别调用不同的 SetChildAlongAxisWithScale 重载。
可以看到,alignmentOnAxis 这一属性只在 controlSize 为 false 时才会被使用alignmentOnAxis 来计算子物体的起始位置。而在 controlSize 为 true 时,子物体的大小由布局组件控制,实际上全部都以 UpperLeft 的方式排列 。
沿着布局方向排列
至于沿着布局方向排列的情况,逻辑就复杂了许多,我们继续分析:
1
2
3
4
5
6
7
8
9
10
11
12
13
14
15
16
17
18
19
20
21
22
23
24
25
26
27
28
29
30
31
32
33
34
35
36
float pos = (axis == 0 ? padding.left : padding.top);float itemFlexibleMultiplier = 0 ;float surplusSpace = size - GetTotalPreferredSize(axis);if (surplusSpace > 0 ){ if (GetTotalFlexibleSize(axis) == 0 ) pos = GetStartOffset(axis, GetTotalPreferredSize(axis) - (axis == 0 ? padding.horizontal : padding.vertical)); else if (GetTotalFlexibleSize(axis) > 0 ) itemFlexibleMultiplier = surplusSpace / GetTotalFlexibleSize(axis); } float minMaxLerp = 0 ;if (GetTotalMinSize(axis) != GetTotalPreferredSize(axis)) minMaxLerp = Mathf.Clamp01((size - GetTotalMinSize(axis)) / (GetTotalPreferredSize(axis) - GetTotalMinSize(axis))); for (int i = 0 ; i < rectChildren.Count; i++){ RectTransform child = rectChildren[i]; float min, preferred, flexible; GetChildSizes(child, axis, controlSize, childForceExpandSize, out min, out preferred, out flexible); float scaleFactor = useScale ? child.localScale[axis] : 1f ; float childSize = Mathf.Lerp(min, preferred, minMaxLerp); childSize += flexible * itemFlexibleMultiplier; if (controlSize) { SetChildAlongAxisWithScale(child, axis, pos, childSize, scaleFactor); } else { float offsetInCell = (childSize - child.sizeDelta[axis]) * alignmentOnAxis; SetChildAlongAxisWithScale(child, axis, pos + offsetInCell, scaleFactor); } pos += childSize * scaleFactor + spacing; }
首先,还是计算出了一些布局要用到的参数
1
2
3
float pos = (axis == 0 ? padding.left : padding.top);float itemFlexibleMultiplier = 0 ;float surplusSpace = size - GetTotalPreferredSize(axis);
其中,pos 代表子物体的起始位置,itemFlexibleMultiplier 代表每一单位的 flexible 能够分配到多少空间,surplusSpace 代表供 flexible 分配的剩余空间。
可能这里 flexible 的分配方式有些难以理解,我们以公式说明,假设所有子物体的 flexible 之和为 f total f_{\text{total}} f total S S S flexible 为 f i f_i f i s i s_i s i
s i = S f total ⋅ f i s_i = \frac{S}{f_{\text{total}}} \cdot f_i
s i = f total S ⋅ f i
这里预先计算处理的 itemFlexibleMultiplier 就是 S f total \frac{S}{f_{\text{total}}} f total S
1
2
3
4
5
6
7
if (surplusSpace > 0 ){ if (GetTotalFlexibleSize(axis) == 0 ) pos = GetStartOffset(axis, GetTotalPreferredSize(axis) - (axis == 0 ? padding.horizontal : padding.vertical)); else if (GetTotalFlexibleSize(axis) > 0 ) itemFlexibleMultiplier = surplusSpace / GetTotalFlexibleSize(axis); }
接下来,根据剩余空间是否大于 0,以及 flexible 的总和是否大于 0,来移动起始位置以及决定是否需要分配额外空间。
1
2
3
float minMaxLerp = 0 ;if (GetTotalMinSize(axis) != GetTotalPreferredSize(axis)) minMaxLerp = Mathf.Clamp01((size - GetTotalMinSize(axis)) / (GetTotalPreferredSize(axis) - GetTotalMinSize(axis)));
这里又有一个数学计算,minMaxLerp 代表了能够为单个子物体分配的空间在 min 与 preferred 之间的比例。在遍历子物体的过程中,使用 Mathf.Lerp(min, preferred, minMaxLerp) 即可得到子物体在布局方向上的大小。
1
2
3
4
5
6
7
8
9
10
11
12
13
14
15
16
17
18
19
20
for (int i = 0 ; i < rectChildren.Count; i++){ RectTransform child = rectChildren[i]; float min, preferred, flexible; GetChildSizes(child, axis, controlSize, childForceExpandSize, out min, out preferred, out flexible); float scaleFactor = useScale ? child.localScale[axis] : 1f ; float childSize = Mathf.Lerp(min, preferred, minMaxLerp); childSize += flexible * itemFlexibleMultiplier; if (controlSize) { SetChildAlongAxisWithScale(child, axis, pos, childSize, scaleFactor); } else { float offsetInCell = (childSize - child.sizeDelta[axis]) * alignmentOnAxis; SetChildAlongAxisWithScale(child, axis, pos + offsetInCell, scaleFactor); } pos += childSize * scaleFactor + spacing; }
最后就是遍历子物体并设置子物体的位置和大小了,这里的逻辑与沿着其他轴排列的逻辑类似,但有两点不同:
子物体的大小由自身的大小及 minMaxLerp 与 itemFlexibleMultiplier 这两个布局属性共同决定。
子物体的起始位置要进行排列,因此在遍历时会为 pos 加上子物体的大小和 spacing。
小结
HorizontalOrVerticalLayoutGroup 是 LayoutGroup 的子类,用于实现水平和垂直布局。在类中实现了两个重要的函数: CalcAlongAxis 和 SetChildrenAlongAxis 用于在不同的轴上计算和设置子物体的位置与大小。由于需要考虑多种布局属性,因此这两个函数也较为复杂,但带来的好处就是 HorizontalLayoutGroup 和 VerticalLayoutGroup 只需要少量的代码即可实现水平和垂直布局。
HorizontalLayoutGroup & VerticalLayoutGroup
苦尽甘来,经历了 LayoutGroup、HorizontalOrVerticalLayoutGroup 的洗礼后,我们终于可以坐享其成了!
HorizontalLayoutGroup 和 VerticalLayoutGroup 的代码看上去是如此的简洁美观,但它们的背后确是 HorizontalOrVerticalLayoutGroup 在干各种脏活累活,让我们说:谢谢 HorizontalOrVerticalLayoutGroup!
HorizontalLayoutGroup
1
2
3
4
5
6
7
8
9
10
11
12
13
14
15
16
17
18
19
20
21
22
23
24
25
26
27
28
29
30
31
32
33
34
35
36
37
38
public class HorizontalLayoutGroup : HorizontalOrVerticalLayoutGroup { protected HorizontalLayoutGroup () {} public override void CalculateLayoutInputHorizontal () { base .CalculateLayoutInputHorizontal(); CalcAlongAxis(0 , false ); } public override void CalculateLayoutInputVertical () { CalcAlongAxis(1 , false ); } public override void SetLayoutHorizontal () { SetChildrenAlongAxis(0 , false ); } public override void SetLayoutVertical () { SetChildrenAlongAxis(1 , false ); } }
唯一需要注意的点就是 CalculateLayoutInputHorizontal 中,在调用 CalcAlongAxis 之前,一定要先调用 base.CalculateLayoutInputHorizontal()(layout 中的实现),因为需要先收集 rectChildren 的信息,再进行布局计算。
VerticalLayoutGroup
1
2
3
4
5
6
7
8
9
10
11
12
13
14
15
16
17
18
19
20
21
22
23
24
25
26
public class VerticalLayoutGroup : HorizontalOrVerticalLayoutGroup { protected VerticalLayoutGroup () {} public override void CalculateLayoutInputHorizontal () { base .CalculateLayoutInputHorizontal(); CalcAlongAxis(0 , true ); } public override void CalculateLayoutInputVertical () { CalcAlongAxis(1 , true ); } public override void SetLayoutHorizontal () { SetChildrenAlongAxis(0 , true ); } public override void SetLayoutVertical () { SetChildrenAlongAxis(1 , true ); } }
Unity 甚至没在这里写注释,可见其简单程度
GridLayoutGroup
GridLayoutGroup 用于实现网格布局,不同于 HorizontalLayoutGroup 和 VerticalLayoutGroup,GridLayoutGroup 直接继承自 LayoutGroup,并在类中实现了自己的布局逻辑。
布局属性
GridLayoutGroup 提供了一系列的可配置属性,用于规定布局时的行为。特别的地方在于,GridLayoutGroup 规定了网格的大小,即 cellSize,所有的子物体均按照该尺寸进行布局,不存在随着 PreferredSize 等属性变化的情况。
1
2
3
4
5
6
7
8
9
10
11
12
13
14
15
16
17
18
19
20
21
22
23
24
25
26
27
28
29
30
31
32
33
34
35
36
37
38
39
40
41
42
43
44
45
46
47
48
49
50
public enum Corner{ UpperLeft = 0 , UpperRight = 1 , LowerLeft = 2 , LowerRight = 3 } public enum Axis{ Horizontal = 0 , Vertical = 1 } public enum Constraint{ Flexible = 0 , FixedColumnCount = 1 , FixedRowCount = 2 }
首先是一些枚举类型,Corner 用于规定网格的起始位置,即以何种顺序排列子物体;Axis 用于规定网格的布局方向;Constraint 用于规定网格的约束条件,即固定行数或列数。
1 2 3 4 5 6 7 8 9 10 11 12 13 14 15 16 17 [SerializeField ] protected Corner m_StartCorner = Corner.UpperLeft; public Corner startCorner { get { return m_StartCorner; } set { SetProperty(ref m_StartCorner, value ); } }[SerializeField ] protected Axis m_StartAxis = Axis.Horizontal; public Axis startAxis { get { return m_StartAxis; } set { SetProperty(ref m_StartAxis, value ); } }[SerializeField ] protected Vector2 m_CellSize = new Vector2(100 , 100 ); public Vector2 cellSize { get { return m_CellSize; } set { SetProperty(ref m_CellSize, value ); } }[SerializeField ] protected Vector2 m_Spacing = Vector2.zero; public Vector2 spacing { get { return m_Spacing; } set { SetProperty(ref m_Spacing, value ); } }[SerializeField ] protected Constraint m_Constraint = Constraint.Flexible; public Constraint constraint { get { return m_Constraint; } set { SetProperty(ref m_Constraint, value ); } }[SerializeField ] protected int m_ConstraintCount = 2 ; public int constraintCount { get { return m_ConstraintCount; } set { SetProperty(ref m_ConstraintCount, Mathf.Max(1 , value )); } }
接着是一些布局属性,这里不再赘述。
GridLayoutGroup 自然也要实现 ILayoutElement 接口,用于计算布局信息。
1
2
3
4
5
6
7
8
9
10
11
12
13
14
15
16
17
18
19
20
21
22
23
24
25
public override void CalculateLayoutInputHorizontal (){ base .CalculateLayoutInputHorizontal(); int minColumns = 0 ; int preferredColumns = 0 ; if (m_Constraint == Constraint.FixedColumnCount) { minColumns = preferredColumns = m_ConstraintCount; } else if (m_Constraint == Constraint.FixedRowCount) { minColumns = preferredColumns = Mathf.CeilToInt(rectChildren.Count / (float )m_ConstraintCount - 0.001f ); } else { minColumns = 1 ; preferredColumns = Mathf.CeilToInt(Mathf.Sqrt(rectChildren.Count)); } SetLayoutInputForAxis( padding.horizontal + (cellSize.x + spacing.x) * minColumns - spacing.x, padding.horizontal + (cellSize.x + spacing.x) * preferredColumns - spacing.x, -1 , 0 ); }
在 CalculateLayoutInputHorizontal 函数中,会根据约束条件及子物体个数计算出 minColumns 和 preferredColumns,然后根据 cellSize 和 spacing 设置布局组件的 minWidth 和 preferredWidth。可以看到,在无约束的情况下,会默认以 sqrt(rectChildren.Count) 作为列数。
需要注意的是在计算时用到了这样的技巧:Mathf.CeilToInt(rectChildren.Count / (float)m_ConstraintCount - 0.001f)。
这里减去 0.001 应该是为了避免一些浮点数的计算误差,如计算结果为 3.0000001 时,Mathf.CeilToInt 会向上取整为 4,但实际上 3 列就足够了。这个技巧会在后续的计算中多次出现。
1
2
3
4
5
6
7
8
9
10
11
12
13
14
15
16
17
18
19
20
21
public override void CalculateLayoutInputVertical (){ int minRows = 0 ; if (m_Constraint == Constraint.FixedColumnCount) { minRows = Mathf.CeilToInt(rectChildren.Count / (float )m_ConstraintCount - 0.001f ); } else if (m_Constraint == Constraint.FixedRowCount) { minRows = m_ConstraintCount; } else { float width = rectTransform.rect.width; int cellCountX = Mathf.Max(1 , Mathf.FloorToInt((width - padding.horizontal + spacing.x + 0.001f ) / (cellSize.x + spacing.x))); minRows = Mathf.CeilToInt(rectChildren.Count / (float )cellCountX); } float minSpace = padding.vertical + (cellSize.y + spacing.y) * minRows - spacing.y; SetLayoutInputForAxis(minSpace, minSpace, -1 , 1 ); }
CalculateLayoutInputVertical 的计算逻辑与水平的情况有所差异,可以看到在无约束的情况下,会根据父物体的实际宽度计算出一行能够排列多少个子物体,再由此计算出所需的行数。
SetLayout
布局的设置工作主要由 SetCellsAlongAxis 函数完成,查看该函数的逻辑:
1
2
3
4
5
6
7
8
9
10
11
12
13
14
15
16
17
18
19
20
21
22
23
private void SetCellsAlongAxis (int axis{ if (axis == 0 ) { for (int i = 0 ; i < rectChildren.Count; i++) { RectTransform rect = rectChildren[i]; m_Tracker.Add(this , rect, DrivenTransformProperties.Anchors | DrivenTransformProperties.AnchoredPosition | DrivenTransformProperties.SizeDelta); rect.anchorMin = Vector2.up; rect.anchorMax = Vector2.up; rect.sizeDelta = cellSize; } return ; } }
首先是一个比较奇怪的写法,当 axis 为 0 也即水平方向时,设置了 m_Tracker,并设置子物体的 anchorMin、anchorMax 和 sizeDelta,然后居然就直接返回了。可以看到这里并没有做任何的布局操作。
其中的原因与 LayoutSystem 的布局设置顺序有关,LayoutSystem 会先进行水平方向的局部设置再进行垂直方向的局部设置,按理来说应该按照 axis 的值分别设置不同方向的布局,但 GridLayoutGroup 是个例外,原因是网格状的布局中,水平与垂直方向的布局息息相关,如果强行拆开反而非常麻烦。因此 SetCellsAlongAxis 也是同时设置了两个方向的布局。
但是为了不违反 LayoutSystem 的布局顺序设计,这里还是在调用 SetCellsAlongAxis(0) 时,只设置锚点、大小等,不进行布局,将布局留给 SetCellsAlongAxis(1) 来完成,这样也能满足顺序的需求且不会重复设置。
1
2
3
4
5
6
7
8
9
10
11
12
13
14
15
16
17
18
19
20
21
22
23
24
25
26
27
28
29
30
31
float width = rectTransform.rect.size.x;float height = rectTransform.rect.size.y;int cellCountX = 1 ;int cellCountY = 1 ;if (m_Constraint == Constraint.FixedColumnCount){ cellCountX = m_ConstraintCount; if (rectChildren.Count > cellCountX) cellCountY = rectChildren.Count / cellCountX + (rectChildren.Count % cellCountX > 0 ? 1 : 0 ); } else if (m_Constraint == Constraint.FixedRowCount){ cellCountY = m_ConstraintCount; if (rectChildren.Count > cellCountY) cellCountX = rectChildren.Count / cellCountY + (rectChildren.Count % cellCountY > 0 ? 1 : 0 ); } else { if (cellSize.x + spacing.x <= 0 ) cellCountX = int .MaxValue; else cellCountX = Mathf.Max(1 , Mathf.FloorToInt((width - padding.horizontal + spacing.x + 0.001f ) / (cellSize.x + spacing.x))); if (cellSize.y + spacing.y <= 0 ) cellCountY = int .MaxValue; else cellCountY = Mathf.Max(1 , Mathf.FloorToInt((height - padding.vertical + spacing.y + 0.001f ) / (cellSize.y + spacing.y))); }
接着,会根据父物体的大小及布局的属性,分别计算行与列各能容纳多少个元素,并将结果保存在 cellCountX 和 cellCountY 中。
1
2
3
4
5
6
7
8
9
10
11
12
13
14
15
16
17
18
19
20
21
22
23
24
25
int cornerX = (int )startCorner % 2 ;int cornerY = (int )startCorner / 2 ;int cellsPerMainAxis, actualCellCountX, actualCellCountY;if (startAxis == Axis.Horizontal){ cellsPerMainAxis = cellCountX; actualCellCountX = Mathf.Clamp(cellCountX, 1 , rectChildren.Count); actualCellCountY = Mathf.Clamp(cellCountY, 1 , Mathf.CeilToInt(rectChildren.Count / (float )cellsPerMainAxis)); } else { cellsPerMainAxis = cellCountY; actualCellCountY = Mathf.Clamp(cellCountY, 1 , rectChildren.Count); actualCellCountX = Mathf.Clamp(cellCountX, 1 , Mathf.CeilToInt(rectChildren.Count / (float )cellsPerMainAxis)); } Vector2 requiredSpace = new Vector2( actualCellCountX * cellSize.x + (actualCellCountX - 1 ) * spacing.x, actualCellCountY * cellSize.y + (actualCellCountY - 1 ) * spacing.y ); Vector2 startOffset = new Vector2( GetStartOffset(0 , requiredSpace.x), GetStartOffset(1 , requiredSpace.y) );
接下来,会计算出每一行与每一列真实需要容纳的元素个数,并计算出所需的空间大小 requiredSpace 与起始位置 startOffset。
1
2
3
4
5
6
7
8
9
10
11
12
13
14
15
16
17
18
19
20
21
22
23
for (int i = 0 ; i < rectChildren.Count; i++){ int positionX; int positionY; if (startAxis == Axis.Horizontal) { positionX = i % cellsPerMainAxis; positionY = i / cellsPerMainAxis; } else { positionX = i / cellsPerMainAxis; positionY = i % cellsPerMainAxis; } if (cornerX == 1 ) positionX = actualCellCountX - 1 - positionX; if (cornerY == 1 ) positionY = actualCellCountY - 1 - positionY; SetChildAlongAxis(rectChildren[i], 0 , startOffset.x + (cellSize[0 ] + spacing[0 ]) * positionX, cellSize[0 ]); SetChildAlongAxis(rectChildren[i], 1 , startOffset.y + (cellSize[1 ] + spacing[1 ]) * positionY, cellSize[1 ]); }
最后,遍历所有的子物体,根据起始位置、行列数、大小与间距,设置子物体的位置与大小。可以看出 cornerX 与 cornerY 在这里的作用,当它们取 1 时,会分别从行或者列的最后一个元素开始反向排列。
总结
本文分析了 LayoutSystem 中的 LayoutElement、LayoutGroup、HorizontalOrVerticalLayoutGroup、HorizontalLayoutGroup、VerticalLayoutGroup 以及 GridLayoutGroup 等的实现,内容比较多,且布局的计算都十分繁杂,想必大家看下来也会有些头晕。
在阅读源码时,我们经常难以做好理解总体框架与研究实现细节的平衡,太注重高屋建瓴的设计就只能停留在评论家而不是工程师;而过分纠结细节又会让人迷失在代码的海洋中,失去对整体的把控。平心而论,笔者在阅读源码时也常常陷入这种困境,但也一直在尝试找到一套最适合自己的方法。
回到 LayoutSystem 中,我们已经分析完了各种布局组件的实现方式,但请始终别忘记布局系统的整体脉络:
从整体 UGUI 的工作流程来看,布局系统从何而起?我想答案一定是 CanvasUpdateRegistry,它是连接 UGUI 与 Canvas 的桥梁,监听了 Canvas 即将刷新的事件,并调用 PerformUpdate 方法来处理 m_LayoutRebuildQueue 及 m_GraphicRebuildQueue 两个队列。目前为止,我们还一直停留在 m_LayoutRebuildQueue 的范围内。
容器有了,那么是谁向 m_LayoutRebuildQueue 中添加 UI 组件,使其注册进 LayoutSystem 中的呢?这就是 LayoutRebuilder 所完成的任务,LayoutRebuilder 可以将一个待布局的 UI 组件( RectTransform )包装为一个 LayoutRebuilder 对象,并且分别调用其中的 ILayoutElement 和 ILayoutController 接口来完成布局的计算与设置。
然而,LayoutRebuilder 也只是调用接口中的函数,接口并不实现具体的布局计算与设置,这就是 LayoutElement 与 LayoutGroup 们的作用了。也就上本文所介绍的形形色色的布局方式,它们都真正实现了 ILayoutElement 和 ILayoutController 接口,完成了布局的计算与设置。
至此,整个 LayoutSystem 基本就被我们分析完了。但实际上,LayoutSystem 还有一些内容,如 ContentSizeFitter、AspectRatioFitter 等 ILayoutSelfController,这些就暂鸽吧~
下一章开始,我们将进入 Graphic 的世界,探讨 UGUI 中的绘制流程。