前言

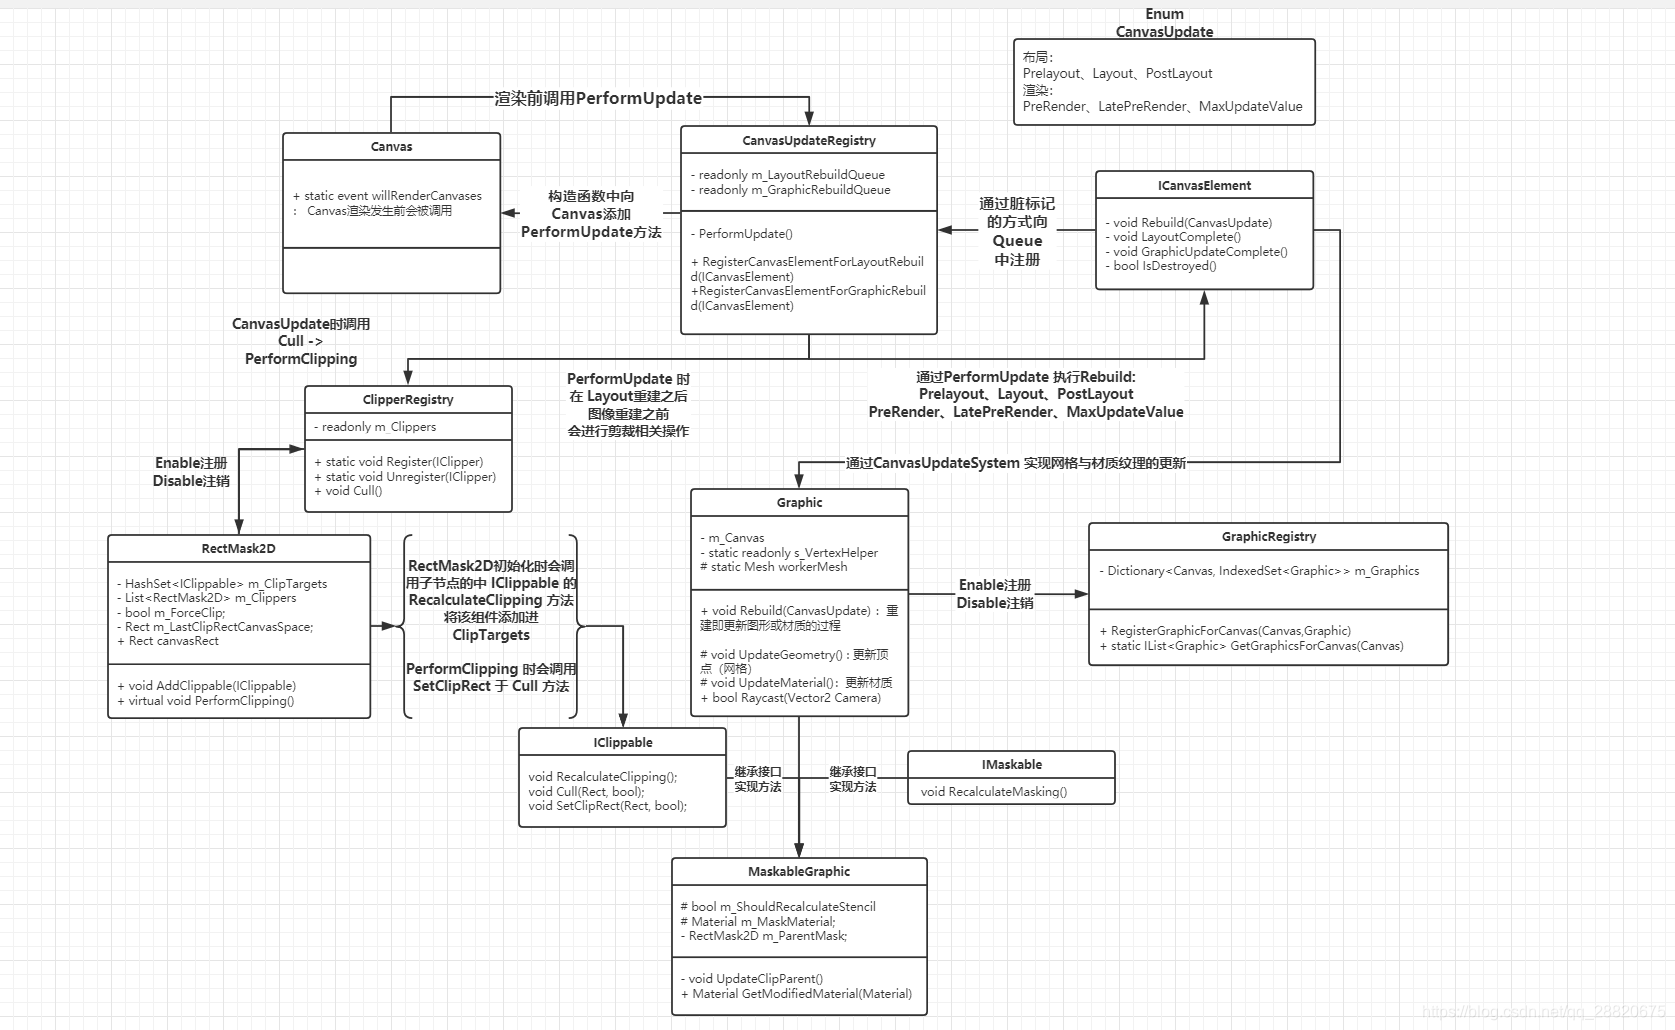
mask.png

在上一节的分析中,我们由 IMaterialModifier 这个接口引出了 UGUI 中的一块重要功能 —— 遮罩。也提到了 UGUI 中提供了两种遮罩的实现方式:Mask 和 RectMask2D。通过对 Mask 的分析我们知道,Mask 是在模板测试阶段通过修改 Stencil Buffer 的值来实现遮罩的。而 RectMask2D 在渲染管线中的位置更靠前,在裁剪测试阶段即可完成遮罩的效果。本节我们就来看看 RectMask2D 以及 MaskableGraphic 的实现。

宇宙万法的源头 —— CanvasUpdateRegistry

CanvasUpdateRegistry 在 UGUI 系统中的重要作用这个系列文章已经提到多次,正是该类监听了 Canvas.willRenderCanvases 事件,并调用 m_LayoutRebuildQueue 以及 m_GraphicRebuildQueue 中 ICanvasElement 的 Rebuild 方法来完成布局以及渲染的整个过程。

让我们重温一下 CanvasUpdateRegistry.PerformUpdate() 方法:

1
2
3
4
5
6
7
8
9
private void PerformUpdate()
{
// Layout Rebuild

// now layout is complete do culling...
ClipperRegistry.instance.Cull();

// Graphic Rebuild
}

实际上在 Layout Rebuild 与 Graphic Rebuild 之间,还有一个 ClipperRegistry.instance.Cull() 的过程。前文 中我们提到该过程用于裁剪元素,而 RectMask2D 也正是在这个阶段完成遮罩的。

无情的裁剪工厂 —— ClipperRegistry

ClipperRegistry 的设计理念与 CanvasUpdateRegistry 类似,都是通过一个单例类来管理整个系统。ClipperRegistry 维护了所有待裁剪的 IClipper 实例,并在 Cull 方法中调用它们的 PerformClipping 方法来完成裁剪。

1
2
3
4
5
6
7
8
9
10
11
12
13
14
15
16
17
18
19
20
21
22
23
24
25
26
27
28
29
30
31
32
33
34
35
36
37
38
39
40
41
42
43
44
public class ClipperRegistry
{
static ClipperRegistry s_Instance;

readonly IndexedSet<IClipper> m_Clippers = new IndexedSet<IClipper>();

public static ClipperRegistry instance
{
get
{
if (s_Instance == null)
s_Instance = new ClipperRegistry();
return s_Instance;
}
}

public void Cull()
{
for (var i = 0; i < m_Clippers.Count; ++i)
{
m_Clippers[i].PerformClipping();
}
}

/// <summary>
/// Register a unique IClipper element
/// </summary>
/// <param name="c">The clipper element to add</param>
public static void Register(IClipper c)
{
if (c == null)
return;
instance.m_Clippers.AddUnique(c);
}

/// <summary>
/// UnRegister a IClipper element
/// </summary>
/// <param name="c">The Element to try and remove.</param>
public static void Unregister(IClipper c)
{
instance.m_Clippers.Remove(c);
}
}

ClipperRegistry 中提供了 Register 与 Unregister 方法供外部的 IClipper 实例注册与注销。

晦涩的接口层 —— IClippable / IMaskable

不得不说,UGUI 对于遮罩功能的接口定义非常地混乱。在 ClipperRegistry 中会调用 IClipper.PerformClipping() 方法,然而 IClipper 本身并不是 “被裁剪者” 而是 “裁剪者”。而真正的 “被裁剪者” 是实现了 IClippable 接口的类,二者的定义如下:

1
2
3
4
5
6
7
8
9
10
11
12
13
14
15
16
17
18
19
20
21
22
23
24
25
26
27
28
29
30
31
32
33
34
35
36
37
38
39
40
41
42
43
44
45
46
47
48
49
/// <summary>
/// Interface that can be used to recieve clipping callbacks as part of the canvas update loop.
/// </summary>
public interface IClipper
{
/// <summary>
/// Function to to cull / clip children elements.
/// </summary>
/// <remarks>
/// Called after layout and before Graphic update of the Canvas update loop.
/// </remarks>

void PerformClipping();
}

/// <summary>
/// Interface for elements that can be clipped if they are under an IClipper
/// </summary>
public interface IClippable
{
/// <summary>
/// GameObject of the IClippable object
/// </summary>
GameObject gameObject { get; }

/// <summary>
/// Will be called when the state of a parent IClippable changed.
/// </summary>
void RecalculateClipping();

/// <summary>
/// The RectTransform of the clippable.
/// </summary>
RectTransform rectTransform { get; }

/// <summary>
/// Clip and cull the IClippable given a specific clipping rect
/// </summary>
/// <param name="clipRect">The Rectangle in which to clip against.</param>
/// <param name="validRect">Is the Rect valid. If not then the rect has 0 size.</param>
void Cull(Rect clipRect, bool validRect);

/// <summary>
/// Set the clip rect for the IClippable.
/// </summary>
/// <param name="value">The Rectangle for the clipping</param>
/// <param name="validRect">Is the rect valid.</param>
void SetClipRect(Rect value, bool validRect);
}

IClippable 是真正的可以被裁剪的对象,提供了三个设置裁剪框以及裁剪的方法。其中 RecalculateClipping() 用于重新计算裁剪范围,而 Cull() 与 SetClipRect() 则是用于裁剪的具体操作。

实际上,我们查看 UGUI 的结构就会发现:仅有 MaskableGraphic 实现了 IClippable 接口,且仅有 RectMask2D 实现了 IClipper 接口。因此,整个 UGUI 的裁剪过程实际上就是 RectMask2D 在裁剪 MaskableGraphic。

此外,由 MaskableGraphic 的定义我们可以看到一个格格不入的接口:IMaskable。

1
2
3
4
public abstract class MaskableGraphic : Graphic, IClippable, IMaskable, IMaterialModifier
{
// ...
}

我们都知道 MaskableGraphic 相较于 Graphic 就是多了两种支持遮罩的方式。其中 IClippable 是裁剪测试阶段的接口,直观清晰。那为什么模板测试阶段的接口要通过 IMaskable 与 IMaterialModifier 两个接口实现呢?

首先查看 IMaskable 接口的定义:

1
2
3
4
5
6
7
8
9
10
11
12
13
14
15
16
17
18
19
20
21
22
23
/// <summary>
/// This element is capable of being masked out.
/// </summary>
public interface IMaskable
{
/// <summary>
/// Recalculate masking for this element and all children elements.
/// </summary>
/// <remarks>
/// Use this to update the internal state (recreate materials etc).
/// </remarks>
void RecalculateMasking();
}

public interface IMaterialModifier
{
/// <summary>
/// Perform material modification in this function.
/// </summary>
/// <param name="baseMaterial">The material that is to be modified</param>
/// <returns>The modified material.</returns>
Material GetModifiedMaterial(Material baseMaterial);
}

我们对比 IClippable 的接口就可以发现,IMaskable 接口实际上是一个不完整的定义,只实现了 RecalculateMasking() 方法用于重新计算遮罩。而真正的遮罩操作则是要通过 IMaterialModifier.GetModifiedMaterial() 来实现。 因此实际上两个接口相配合,才能完成与 IClippable 相同的功能。稍后我们会在 MaskableGraphic 的实现中看到这一点。

为什么一个完整的功能要通过两个接口来实现呢? 这里笔者给出自己的理解:IMaterialModifier 接口实际上是一个通用的接口,用于修改材质。IMaskable 只是恰好可以通过 IMaterialModifier 来实现遮罩功能而已。因此在 MaskableGraphic 中才需要同时实现这两个接口。相比之下 IClippable 是一个专门用于裁剪的接口,接口本身就可以完成遮罩的全部功能。

裁剪者 —— RectMask2D

来看看 RectMask2D 是如何完成裁剪的。

开发者的怜悯

在 RectMask2D 类的开头,可以看到开发者留下的一段注释:

1
2
3
4
5
6
7
8
9
10
11
12
/// <summary>
/// A 2D rectangular mask that allows for clipping / masking of areas outside the mask.
/// </summary>
/// <remarks>
/// The RectMask2D behaves in a similar way to a standard Mask component. It differs though in some of the restrictions that it has.
/// A RectMask2D:
/// *Only works in the 2D plane
/// *Requires elements on the mask to be coplanar.
/// *Does not require stencil buffer / extra draw calls
/// *Requires fewer draw calls
/// *Culls elements that are outside the mask area.
/// </remarks>

这段注释极好地解释了 RectMask2D 与 Mask 的区别,甚至可以当作八股来背!

RectMask2D:

  1. 仅作用于 2D 平面

  2. 要求 RectMask2D 及其子物体在同一平面

  3. 不需要 Stencil Buffer 的支持以及额外的 Draw Call

生命周期函数

1
2
3
4
5
6
7
8
9
10
11
12
13
14
15
16
17
18
19
20
21
22
23
24
25
26
27
28
29
30
[NonSerialized]
private HashSet<MaskableGraphic> m_MaskableTargets = new HashSet<MaskableGraphic>();

[NonSerialized]
private HashSet<IClippable> m_ClipTargets = new HashSet<IClippable>();

[NonSerialized]
private bool m_ShouldRecalculateClipRects;

protected override void OnEnable()
{
base.OnEnable();
m_ShouldRecalculateClipRects = true;
ClipperRegistry.Register(this);
MaskUtilities.Notify2DMaskStateChanged(this);
}

protected override void OnDisable()
{
// we call base OnDisable first here
// as we need to have the IsActive return the
// correct value when we notify the children
// that the mask state has changed.
base.OnDisable();
m_ClipTargets.Clear();
m_MaskableTargets.Clear();
m_Clippers.Clear();
ClipperRegistry.Unregister(this);
MaskUtilities.Notify2DMaskStateChanged(this);
}

首先,RectMask2D 会在 OnEnable 与 OnDisable 方法中分别向 ClipperRegistry 注册与注销自己。同时,RectMask2D 会调用 MaskUtilities.Notify2DMaskStateChanged(this) 来通知所有的 MaskableGraphic 自己的状态发生了变化。

1
2
3
4
5
6
7
8
9
10
11
12
13
14
15
public static void Notify2DMaskStateChanged(Component mask)
{
var components = ListPool<Component>.Get();
mask.GetComponentsInChildren(components);
for (var i = 0; i < components.Count; i++)
{
if (components[i] == null || components[i].gameObject == mask.gameObject)
continue;

var toNotify = components[i] as IClippable;
if (toNotify != null)
toNotify.RecalculateClipping();
}
ListPool<Component>.Release(components);
}

该函数会遍历 RectMask2D 下的所有 IClippable 实例,并调用它们的 RecalculateClipping() 方法,用于重新计算遮罩状态。

PerformClipping

RectMask2D 会在 PerformClipping() 方法中完成对子物体的裁剪:

1
2
3
4
5
6
7
8
9
10
11
12
13
14
15
16
17
public virtual void PerformClipping()
{
// ...

if (m_ShouldRecalculateClipRects)
{
MaskUtilities.GetRectMasksForClip(this, m_Clippers);
m_ShouldRecalculateClipRects = false;
}

// get the compound rects from
// the clippers that are valid
bool validRect = true;
Rect clipRect = Clipping.FindCullAndClipWorldRect(m_Clippers, out validRect);

// ...
}

首先,RectMask2D 会收集父物体中的的所有 RectMask2D 对象,以确定其子物体要受到多少个裁剪框的裁剪;其次会通过 FindCullAndClipWorldRect() 方法找到所有裁剪框的交集,得到最终作用于子物体的裁剪框。这两个函数我们就不分析了,逻辑较为简单。需要注意的是,由于 RectMask2D 仅限于对子物体做长方形的裁剪,因此在计算交集时也仅会简单地计算出 AABB 包围盒,如果涉及到旋转等情况就很容易计算错误,这种情况最好自己实现一个 IClippable 接口。

1
2
3
4
5
6
// If the mask is in ScreenSpaceOverlay/Camera render mode, its content is only rendered when its rect
// overlaps that of the root canvas.
RenderMode renderMode = Canvas.rootCanvas.renderMode;
bool maskIsCulled =
(renderMode == RenderMode.ScreenSpaceCamera || renderMode == RenderMode.ScreenSpaceOverlay) &&
!clipRect.Overlaps(rootCanvasRect, true);

其次,会通过裁剪框与 Canvas 的包围盒是否有交集来判断是否需要裁剪,如果裁剪框位于 Canvas 之外,则无需进一步处理。

1
2
3
4
5
6
7
8
9
10
11
12
13
14
15
16
17
18
19
20
21
22
23
24
25
26
27
28
29
30
31
32
33
34
35
36
if (clipRect != m_LastClipRectCanvasSpace)
{
foreach (IClippable clipTarget in m_ClipTargets)
{
clipTarget.SetClipRect(clipRect, validRect);
}

foreach (MaskableGraphic maskableTarget in m_MaskableTargets)
{
maskableTarget.SetClipRect(clipRect, validRect);
maskableTarget.Cull(clipRect, validRect);
}
}
else if (m_ForceClip)
{
foreach (IClippable clipTarget in m_ClipTargets)
{
clipTarget.SetClipRect(clipRect, validRect);
}

foreach (MaskableGraphic maskableTarget in m_MaskableTargets)
{
maskableTarget.SetClipRect(clipRect, validRect);

if (maskableTarget.canvasRenderer.hasMoved)
maskableTarget.Cull(clipRect, validRect);
}
}
else
{
foreach (MaskableGraphic maskableTarget in m_MaskableTargets)
{
if (maskableTarget.canvasRenderer.hasMoved)
maskableTarget.Cull(clipRect, validRect);
}
}

最后会根据各种条件来遍历 m_ClipTargets 与 m_MaskableTargets,使用 clipRect 完成裁剪。

这里需要注意的是,RectMask2D 中维护了两个序列,分别用于存储 IClippable 与 MaskableGraphic 对象。但实际上只对 MaskableGraphic 对象进行了完整的裁剪操作,即 SetClipRect() 与 Cull() 两个方法都被调用,而 IClippable 对象仅仅调用了 SetClipRect() 方法。但实际上在 UGUI 中也只有 MaskableGraphic 实现了 IClippable 接口,因此在默认情况下 m_ClipTargets 应该是空的,不太明白这样设计的原因。

IClippable 对象的注册与注销

RectMask2D 中提供了两个方法用于注册与注销 IClippable 对象:

1
2
3
4
5
6
7
8
9
10
11
12
13
14
15
16
17
18
19
20
21
22
23
24
25
26
27
28
29
30
31
32
public void AddClippable(IClippable clippable)
{
if (clippable == null)
return;
m_ShouldRecalculateClipRects = true;
MaskableGraphic maskable = clippable as MaskableGraphic;

if (maskable == null)
m_ClipTargets.Add(clippable);
else
m_MaskableTargets.Add(maskable);

m_ForceClip = true;
}

public void RemoveClippable(IClippable clippable)
{
if (clippable == null)
return;

m_ShouldRecalculateClipRects = true;
clippable.SetClipRect(new Rect(), false);

MaskableGraphic maskable = clippable as MaskableGraphic;

if (maskable == null)
m_ClipTargets.Remove(clippable);
else
m_MaskableTargets.Remove(maskable);

m_ForceClip = true;
}

从这两个函数中也可以看出,如果传入的 clippable 对象是 MaskableGraphic 类型,则会被加入到 m_MaskableTargets 中,否则会被加入到 m_ClipTargets 中。此外,在注销时会调用 clippable.SetClipRect(new Rect(), false) 来清除裁剪框。

万物之终结 —— MaskableGraphic

前面铺垫了这么久,其实所有的功能都只是为了给 MaskableGraphic 提供两种遮罩的方式,现在就来看看 MaskableGraphic 是如何实现的吧。

成员变量

1
2
3
4
5
6
7
8
9
10
11
12
13
14
15
16
17
18
19
20
21
// m_Maskable is whether this graphic is allowed to be masked or not. It has the matching public property maskable.
// The default for m_Maskable is true, so graphics under a mask are masked out of the box.
// The maskable property can be turned off from script by the user if masking is not desired.
[NonSerialized]
private bool m_Maskable = true;

/// <summary>
/// Does this graphic allow masking.
/// </summary>
public bool maskable
{
get { return m_Maskable; }
set
{
if (value == m_Maskable)
return;
m_Maskable = value;
m_ShouldRecalculateStencil = true;
SetMaterialDirty();
}
}

首先,定义了一个 m_Maskable 变量用于标识该 MaskableGraphic 是否可以被遮罩。这个变量可以通过 maskable 属性进行设置。如果 m_Maskable 为 false 的话则无论哪种遮罩都不会对其生效。

1
2
3
4
5
6
7
8
9
10
11
12
13
14
15
16
17
18
19
[Serializable]
public class CullStateChangedEvent : UnityEvent<bool> {}

// Event delegates triggered on click.
[SerializeField]
private CullStateChangedEvent m_OnCullStateChanged = new CullStateChangedEvent();

/// <summary>
/// Callback issued when culling changes.
/// </summary>
/// <remarks>
/// Called whene the culling state of this MaskableGraphic either becomes culled or visible. You can use this to control other elements
/// of your UI as culling happens.
/// </remarks>
public CullStateChangedEvent onCullStateChanged
{
get { return m_OnCullStateChanged; }
set { m_OnCullStateChanged = value; }
}

其次定义了一个 CullStateChangedEvent 事件,用于在裁剪状态发生变化时被触发。这个事件在 Cull() 方法中会被调用。

IClippable 接口实现

1
2
3
4
5
6
7
8
9
10
11
12
13
14
15
16
public virtual void Cull(Rect clipRect, bool validRect)
{
var cull = !validRect || !clipRect.Overlaps(rootCanvasRect, true);
UpdateCull(cull);
}

private void UpdateCull(bool cull)
{
if (canvasRenderer.cull != cull)
{
canvasRenderer.cull = cull;
UISystemProfilerApi.AddMarker("MaskableGraphic.cullingChanged", this);
m_OnCullStateChanged.Invoke(cull);
OnCullingChanged();
}
}

Cull() 用于判断当前的裁剪框是否需要被剔除,如果裁剪框与 Canvas 的包围盒没有交集,则不会渲染所有的物体,并且会触发相应的回调。

1
2
3
4
5
6
7
8
9
10
/// <summary>
/// See IClippable.SetClipRect
/// </summary>
public virtual void SetClipRect(Rect clipRect, bool validRect)
{
if (validRect)
canvasRenderer.EnableRectClipping(clipRect); // 真正完成裁剪的地方
else
canvasRenderer.DisableRectClipping();
}

SetClipRect() 方法则是用于设置裁剪框,如果 validRect 为 true 则会调用 canvasRenderer.EnableRectClipping(clipRect) 将裁剪框传递给 canvasRenderer,完成裁剪的设置。

1
2
3
4
5
6
7
8
9
10
11
12
13
14
15
16
17
18
19
20
21
22
23
24
25
private void UpdateClipParent()
{
var newParent = (maskable && IsActive()) ? MaskUtilities.GetRectMaskForClippable(this) : null;

// if the new parent is different OR is now inactive
if (m_ParentMask != null && (newParent != m_ParentMask || !newParent.IsActive()))
{
m_ParentMask.RemoveClippable(this);
UpdateCull(false);
}

// don't re-add it if the newparent is inactive
if (newParent != null && newParent.IsActive())
newParent.AddClippable(this);

m_ParentMask = newParent;
}

/// <summary>
/// See IClippable.RecalculateClipping
/// </summary>
public virtual void RecalculateClipping()
{
UpdateClipParent();
}

在 RecalculateClipping() 的实现中,首先会调用 MaskUtilities.GetRectMaskForClippable() 方法来获取当前 MaskableGraphic 的父 RectMask2D 对象,然后会调用相应的 AddClippable() 与 RemoveClippable() 方法来将自身注册进父 RectMask2D 对象中或注销自身。

IMaskable 接口实现

由于 Stencil Buffer 方式的 Mask 需要通过 IMaterialModifier 接口来实现,因此 MaskableGraphic 也需要实现这个接口。

1
2
3
4
5
6
7
8
9
10
11
12
13
14
15
16
17
18
19
20
21
22
23
24
25
public virtual Material GetModifiedMaterial(Material baseMaterial)
{
var toUse = baseMaterial;

if (m_ShouldRecalculateStencil)
{
var rootCanvas = MaskUtilities.FindRootSortOverrideCanvas(transform);
m_StencilValue = maskable ? MaskUtilities.GetStencilDepth(transform, rootCanvas) : 0;
m_ShouldRecalculateStencil = false;
}

// if we have a enabled Mask component then it will
// generate the mask material. This is an optimisation
// it adds some coupling between components though :(
Mask maskComponent = GetComponent<Mask>();
if (m_StencilValue > 0 && (maskComponent == null || !maskComponent.IsActive()))
{
var maskMat = StencilMaterial.Add(toUse, (1 << m_StencilValue) - 1, StencilOp.Keep, CompareFunction.Equal,
ColorWriteMask.All, (1 << m_StencilValue) - 1, 0);
StencilMaterial.Remove(m_MaskMaterial);
m_MaskMaterial = maskMat;
toUse = m_MaskMaterial;
}
return toUse;
}

UGUI 对于 Stencil Buffer 中 Ref 数值的设置逻辑在 上一篇文章 中已经分析过了,这里不再赘述。可以看到,在默认情况下(Graphic 没有挂载 Mask 组件),会将 StencilID 设置为与父物体相同的值且 Keep StencilBuffer 中的值,这意味着该物体将只会在父物体的遮罩范围内显示,从而实现遮罩的效果。

1
2
3
4
5
6
7
8
9
public virtual void RecalculateMasking()
{
// Remove the material reference as either the graphic of the mask has been enable/ disabled.
// This will cause the material to be repopulated from the original if need be. (case 994413)
StencilMaterial.Remove(m_MaskMaterial);
m_MaskMaterial = null;
m_ShouldRecalculateStencil = true;
SetMaterialDirty();
}

对于 IMaskable 接口的实现则十分简单,仅仅需要移除当前的 mask 材质并对材质进行重新计算即可。从这里也可以看出,IMaskable 接口确实需要与 IMaterialModifier 接口配合使用,才能完成遮罩的功能。

RecalculateClipping 及 RecalculateMasking 的调用时机

RecalculateClipping() 与 RecalculateMasking() 方法都是用于重新计算遮罩的状态,让我们来研究一下这两个方法的调用时机。

1
2
3
4
5
6
7
8
9
10
11
12
13
14
15
16
17
18
19
20
21
22
23
24
25
26
27
28
29
30
31
public static void Notify2DMaskStateChanged(Component mask)
{
var components = ListPool<Component>.Get();
mask.GetComponentsInChildren(components);
for (var i = 0; i < components.Count; i++)
{
if (components[i] == null || components[i].gameObject == mask.gameObject)
continue;

var toNotify = components[i] as IClippable;
if (toNotify != null)
toNotify.RecalculateClipping();
}
ListPool<Component>.Release(components);
}

public static void NotifyStencilStateChanged(Component mask)
{
var components = ListPool<Component>.Get();
mask.GetComponentsInChildren(components);
for (var i = 0; i < components.Count; i++)
{
if (components[i] == null || components[i].gameObject == mask.gameObject)
continue;

var toNotify = components[i] as IMaskable;
if (toNotify != null)
toNotify.RecalculateMasking();
}
ListPool<Component>.Release(components);
}

在 MaskUtilities 类中提供了两个静态方法 Notify2DMaskStateChanged() 与 NotifyStencilStateChanged(),用于重新计算一个 mask 下所有子物体的遮罩状态。

1
2
3
4
5
6
7
8
9
10
11
12
13
14
15
16
17
18
19
20
21
22
23
24
25
26
27
28
29
30
31
32
33
// RectMask2D.cs

protected override void OnEnable()
{
base.OnEnable();
m_ShouldRecalculateClipRects = true;
ClipperRegistry.Register(this);
MaskUtilities.Notify2DMaskStateChanged(this);
}

protected override void OnDisable()
{
base.OnDisable();
m_ClipTargets.Clear();
m_MaskableTargets.Clear();
m_Clippers.Clear();
ClipperRegistry.Unregister(this);
MaskUtilities.Notify2DMaskStateChanged(this);
}

#if UNITY_EDITOR
protected override void OnValidate()
{
base.OnValidate();
m_ShouldRecalculateClipRects = true;

if (!IsActive())
return;

MaskUtilities.Notify2DMaskStateChanged(this);
}

#endif

对于 RectMask2D 来说,会在 OnEnable() 与 OnDisable() 方法中调用 Notify2DMaskStateChanged() 方法,用于重新计算所有子物体的裁剪状态。而在 OnValidate() 方法中也会调用该方法,用于在编辑器中实时更新遮罩状态。

1
2
3
4
5
6
7
8
9
10
11
12
13
14
15
16
17
18
19
20
21
22
23
24
25
26
27
28
29
30
31
32
33
34
35
36
37
38
39
40
41
42
43
44
45
46
// Mask.cs
protected override void OnEnable()
{
base.OnEnable();
if (graphic != null)
{
graphic.canvasRenderer.hasPopInstruction = true;
graphic.SetMaterialDirty();
}

MaskUtilities.NotifyStencilStateChanged(this);
}

protected override void OnDisable()
{
base.OnDisable();
if (graphic != null)
{
graphic.SetMaterialDirty();
graphic.canvasRenderer.hasPopInstruction = false;
graphic.canvasRenderer.popMaterialCount = 0;
}

StencilMaterial.Remove(m_MaskMaterial);
m_MaskMaterial = null;
StencilMaterial.Remove(m_UnmaskMaterial);
m_UnmaskMaterial = null;

MaskUtilities.NotifyStencilStateChanged(this);
}

#if UNITY_EDITOR
protected override void OnValidate()
{
base.OnValidate();

if (!IsActive())
return;

if (graphic != null)
graphic.SetMaterialDirty();

MaskUtilities.NotifyStencilStateChanged(this);
}

#endif

对于 Mask 来说,逻辑也是类似的。但与 RectMask2D 不同的是,MaskableGraphic 也会在 OnEnable() 与 OnDisable() 方法中调用 NotifyStencilStateChanged()。

1
2
3
4
5
6
7
8
9
10
11
12
13
14
15
16
17
18
19
20
21
22
23
24
25
26
27
protected override void OnEnable()
{
base.OnEnable();
m_ShouldRecalculateStencil = true;
UpdateClipParent();
SetMaterialDirty();

if (GetComponent<Mask>() != null)
{
MaskUtilities.NotifyStencilStateChanged(this);
}
}

protected override void OnDisable()
{
base.OnDisable();
m_ShouldRecalculateStencil = true;
SetMaterialDirty();
UpdateClipParent();
StencilMaterial.Remove(m_MaskMaterial);
m_MaskMaterial = null;

if (GetComponent<Mask>() != null)
{
MaskUtilities.NotifyStencilStateChanged(this);
}
}

这就涉及到 RectMask2D 与 Mask 的核心区别了:由于 Mask 依赖于 Graphic 组件来设置材质,因此 MaskableGraphic 的启用与否也会影响到 Mask 的遮罩状态,因此需要在 MaskableGraphic 的 OnEnable() 与 OnDisable() 方法中也调用 NotifyStencilStateChanged() 来重新计算遮罩状态。而 RectMask2D 仅依赖于 RectTransform 组件,起作用的原理与 Graphic 组件无关,因此 Graphic 组件的状态并不会影响到 RectMask2D,即使禁用了 Graphic 组件,RectMask2D 依旧生效。

总结

mask.png

至此,我们就分析完了 UGUI 中的遮罩功能的实现。在 UGUI 中,有两种实现遮罩的方式:Mask 与 RectMask2D。Mask 在模板测试阶段起作用,通过修改 Stencil Buffer 的值来实现遮罩,这一功能是通过给 Graphic 组件设置不同的材质来实现的,因此 Mask 依赖于 Graphic 组件,且会产生额外的 Draw Call;而 RectMask2D 在裁剪测试阶段起作用,通过设置 CanvasRenderer 的裁剪框来实现遮罩,RectMask2D 仅依赖于 RectTransform 组件,因此不会产生额外的 Draw Call,但只适用于 2D 且共面的场景。

就接口间的关系来看,CanvasUpdateRegistry 会在 Layout 阶段之后调用 ClipperRegistry 的 Cull() 方法,来完成裁剪的操作。IClipper 会将自身注册到 ClipperRegistry 中以生效;而在 Render 阶段,Graphic 会在 Rebuild() 方法中调用 UpdateMaterial() 方法来更新材质,这一过程会调用 IMaskable.GetModifiedMaterial() 方法来完成对材质的修改,从而实现遮罩的效果。

MaskableGraphic 派生自 Graphic 组件,实现了 IClippable 与 IMaskable (以及 IMaterialModifier)接口,用于支持 RectMask2D 与 Mask 的遮罩功能。分析到这里,我们已经距离实际的 UGUI 组件非常接近了,RawImage 与 Image 等组件均直接继承自 MaskableGraphic。