前言

mask.png

在上一节的分析中,我们由 IMaterialModifier 这个接口引出了 UGUI 中的一块重要功能 —— 遮罩。也提到了 UGUI 中提供了两种遮罩的实现方式:MaskRectMask2D。通过对 Mask 的分析我们知道,Mask 是在模板测试阶段通过修改 Stencil Buffer 的值来实现遮罩的。而 RectMask2D 在渲染管线中的位置更靠前,在裁剪测试阶段即可完成遮罩的效果。本节我们就来看看 RectMask2D 以及 MaskableGraphic 的实现。

宇宙万法的源头 —— CanvasUpdateRegistry

CanvasUpdateRegistry 在 UGUI 系统中的重要作用这个系列文章已经提到多次,正是该类监听了 Canvas.willRenderCanvases 事件,并调用 m_LayoutRebuildQueue 以及 m_GraphicRebuildQueueICanvasElementRebuild 方法来完成布局以及渲染的整个过程。

让我们重温一下 CanvasUpdateRegistry.PerformUpdate() 方法:

1
2
3
4
5
6
7
8
9
private void PerformUpdate()
{
// Layout Rebuild

// now layout is complete do culling...
ClipperRegistry.instance.Cull();

// Graphic Rebuild
}

实际上在 Layout Rebuild 与 Graphic Rebuild 之间,还有一个 ClipperRegistry.instance.Cull() 的过程。前文 中我们提到该过程用于裁剪元素,而 RectMask2D 也正是在这个阶段完成遮罩的。

无情的裁剪工厂 —— ClipperRegistry

ClipperRegistry 的设计理念与 CanvasUpdateRegistry 类似,都是通过一个单例类来管理整个系统。ClipperRegistry 维护了所有待裁剪的 IClipper 实例,并在 Cull 方法中调用它们的 PerformClipping 方法来完成裁剪。

1
2
3
4
5
6
7
8
9
10
11
12
13
14
15
16
17
18
19
20
21
22
23
24
25
26
27
28
29
30
31
32
33
34
35
36
37
38
39
40
41
42
43
44
public class ClipperRegistry
{
static ClipperRegistry s_Instance;

readonly IndexedSet<IClipper> m_Clippers = new IndexedSet<IClipper>();

public static ClipperRegistry instance
{
get
{
if (s_Instance == null)
s_Instance = new ClipperRegistry();
return s_Instance;
}
}
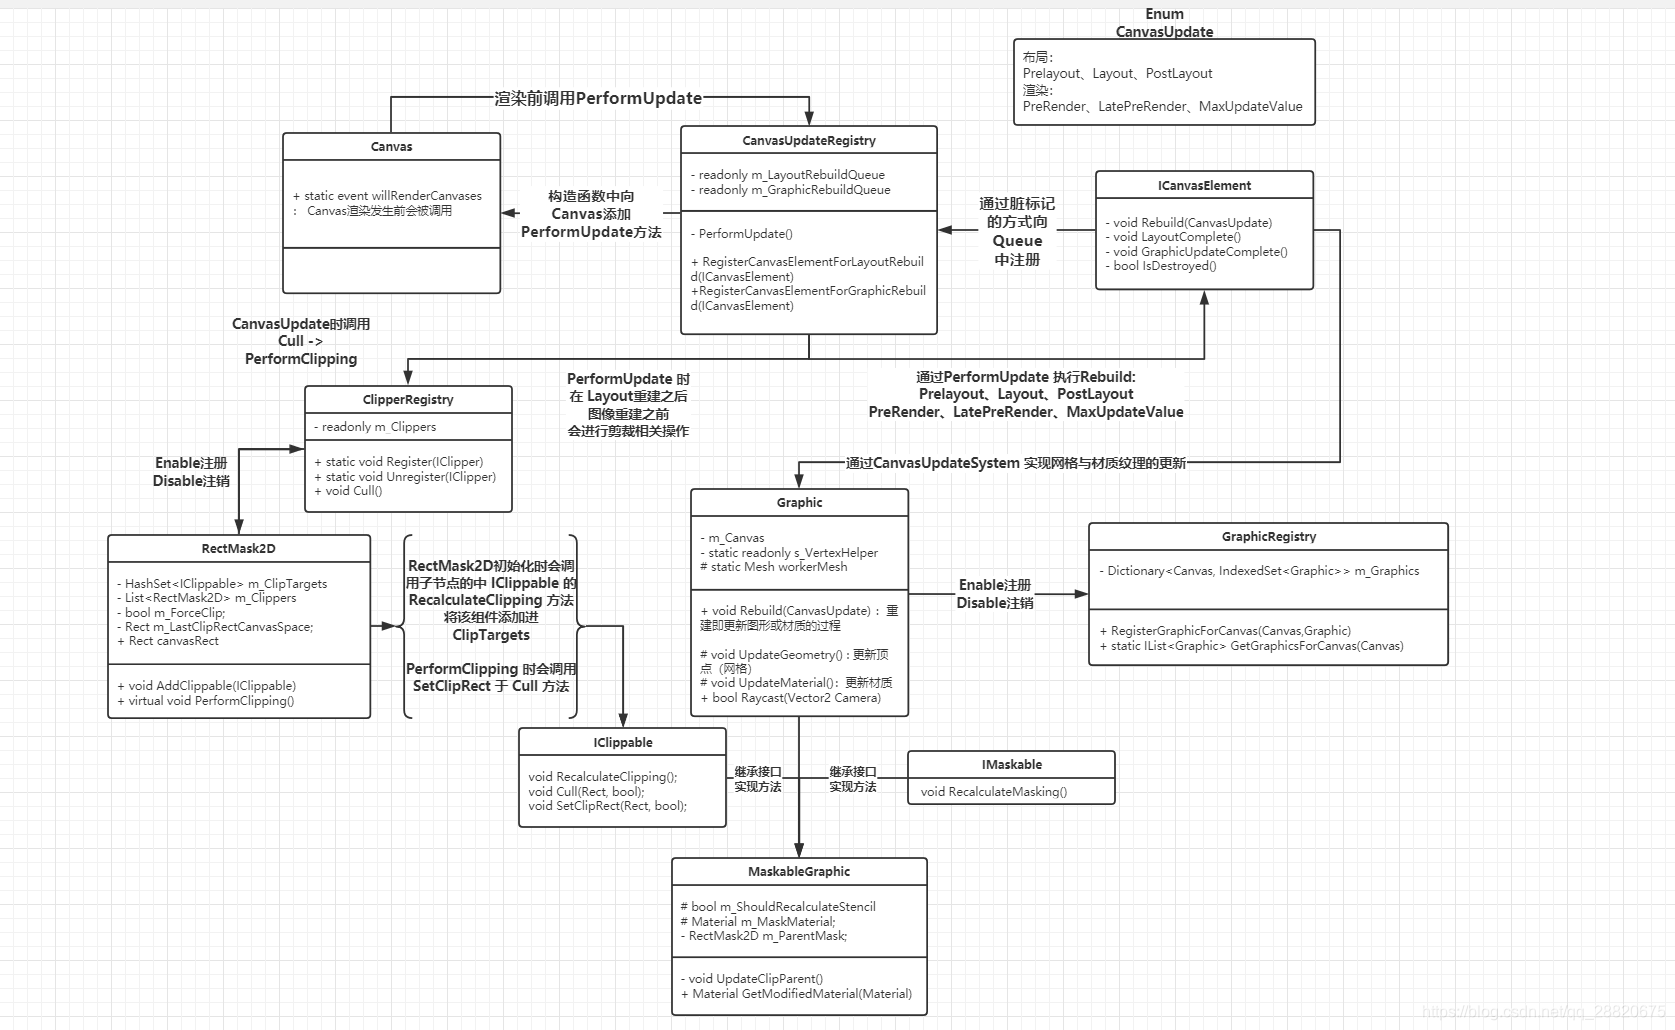
public void Cull()
{
for (var i = 0; i < m_Clippers.Count; ++i)
{
m_Clippers[i].PerformClipping();
}
}

/// <summary>
/// Register a unique IClipper element
/// </summary>
/// <param name="c">The clipper element to add</param>
public static void Register(IClipper c)
{
if (c == null)
return;
instance.m_Clippers.AddUnique(c);
}

/// <summary>
/// UnRegister a IClipper element
/// </summary>
/// <param name="c">The Element to try and remove.</param>
public static void Unregister(IClipper c)
{
instance.m_Clippers.Remove(c);
}
}

ClipperRegistry 中提供了 RegisterUnregister 方法供外部的 IClipper 实例注册与注销。

晦涩的接口层 —— IClippable / IMaskable

不得不说,UGUI 对于遮罩功能的接口定义非常地混乱。在 ClipperRegistry 中会调用 IClipper.PerformClipping() 方法,然而 IClipper 本身并不是 “被裁剪者” 而是 “裁剪者”。而真正的 “被裁剪者” 是实现了 IClippable 接口的类,二者的定义如下:

1
2
3
4
5
6
7
8
9
10
11
12
13
14
15
16
17
18
19
20
21
22
23
24
25
26
27
28
29
30
31
32
33
34
35
36
37
38
39
40
41
42
43
44
45
46
47
48
49
/// <summary>
/// Interface that can be used to recieve clipping callbacks as part of the canvas update loop.
/// </summary>
public interface IClipper
{
/// <summary>
/// Function to to cull / clip children elements.
/// </summary>
/// <remarks>
/// Called after layout and before Graphic update of the Canvas update loop.
/// </remarks>

void PerformClipping();
}

/// <summary>
/// Interface for elements that can be clipped if they are under an IClipper
/// </summary>
public interface IClippable
{
/// <summary>
/// GameObject of the IClippable object
/// </summary>
GameObject gameObject { get; }

/// <summary>
/// Will be called when the state of a parent IClippable changed.
/// </summary>
void RecalculateClipping();

/// <summary>
/// The RectTransform of the clippable.
/// </summary>
RectTransform rectTransform { get; }

/// <summary>
/// Clip and cull the IClippable given a specific clipping rect
/// </summary>
/// <param name="clipRect">The Rectangle in which to clip against.</param>
/// <param name="validRect">Is the Rect valid. If not then the rect has 0 size.</param>
void Cull(Rect clipRect, bool validRect);

/// <summary>
/// Set the clip rect for the IClippable.
/// </summary>
/// <param name="value">The Rectangle for the clipping</param>
/// <param name="validRect">Is the rect valid.</param>
void SetClipRect(Rect value, bool validRect);
}

IClippable 是真正的可以被裁剪的对象,提供了三个设置裁剪框以及裁剪的方法。其中 RecalculateClipping() 用于重新计算裁剪范围,而 Cull()SetClipRect() 则是用于裁剪的具体操作。

实际上,我们查看 UGUI 的结构就会发现:仅有 MaskableGraphic 实现了 IClippable 接口,且仅有 RectMask2D 实现了 IClipper 接口。因此,整个 UGUI 的裁剪过程实际上就是 RectMask2D 在裁剪 MaskableGraphic

此外,由 MaskableGraphic 的定义我们可以看到一个格格不入的接口:IMaskable

1
2
3
4
public abstract class MaskableGraphic : Graphic, IClippable, IMaskable, IMaterialModifier
{
// ...
}

我们都知道 MaskableGraphic 相较于 Graphic 就是多了两种支持遮罩的方式。其中 IClippable 是裁剪测试阶段的接口,直观清晰。那为什么模板测试阶段的接口要通过 IMaskableIMaterialModifier 两个接口实现呢?

首先查看 IMaskable 接口的定义:

1
2
3
4
5
6
7
8
9
10
11
12
13
14
15
16
17
18
19
20
21
22
23
/// <summary>
/// This element is capable of being masked out.
/// </summary>
public interface IMaskable
{
/// <summary>
/// Recalculate masking for this element and all children elements.
/// </summary>
/// <remarks>
/// Use this to update the internal state (recreate materials etc).
/// </remarks>
void RecalculateMasking();
}

public interface IMaterialModifier
{
/// <summary>
/// Perform material modification in this function.
/// </summary>
/// <param name="baseMaterial">The material that is to be modified</param>
/// <returns>The modified material.</returns>
Material GetModifiedMaterial(Material baseMaterial);
}

我们对比 IClippable 的接口就可以发现,IMaskable 接口实际上是一个不完整的定义,只实现了 RecalculateMasking() 方法用于重新计算遮罩。而真正的遮罩操作则是要通过 IMaterialModifier.GetModifiedMaterial() 来实现。 因此实际上两个接口相配合,才能完成与 IClippable 相同的功能。稍后我们会在 MaskableGraphic 的实现中看到这一点。

为什么一个完整的功能要通过两个接口来实现呢? 这里笔者给出自己的理解:IMaterialModifier 接口实际上是一个通用的接口,用于修改材质。IMaskable 只是恰好可以通过 IMaterialModifier 来实现遮罩功能而已。因此在 MaskableGraphic 中才需要同时实现这两个接口。相比之下 IClippable 是一个专门用于裁剪的接口,接口本身就可以完成遮罩的全部功能。

裁剪者 —— RectMask2D

来看看 RectMask2D 是如何完成裁剪的。

开发者的怜悯

RectMask2D 类的开头,可以看到开发者留下的一段注释:

1
2
3
4
5
6
7
8
9
10
11
12
/// <summary>
/// A 2D rectangular mask that allows for clipping / masking of areas outside the mask.
/// </summary>
/// <remarks>
/// The RectMask2D behaves in a similar way to a standard Mask component. It differs though in some of the restrictions that it has.
/// A RectMask2D:
/// *Only works in the 2D plane
/// *Requires elements on the mask to be coplanar.
/// *Does not require stencil buffer / extra draw calls
/// *Requires fewer draw calls
/// *Culls elements that are outside the mask area.
/// </remarks>

这段注释极好地解释了 RectMask2DMask 的区别,甚至可以当作八股来背!

RectMask2D:

  1. 仅作用于 2D 平面

  2. 要求 RectMask2D 及其子物体在同一平面

  3. 不需要 Stencil Buffer 的支持以及额外的 Draw Call

生命周期函数

1
2
3
4
5
6
7
8
9
10
11
12
13
14
15
16
17
18
19
20
21
22
23
24
25
26
27
28
29
30
[NonSerialized]
private HashSet<MaskableGraphic> m_MaskableTargets = new HashSet<MaskableGraphic>();

[NonSerialized]
private HashSet<IClippable> m_ClipTargets = new HashSet<IClippable>();

[NonSerialized]
private bool m_ShouldRecalculateClipRects;

protected override void OnEnable()
{
base.OnEnable();
m_ShouldRecalculateClipRects = true;
ClipperRegistry.Register(this);
MaskUtilities.Notify2DMaskStateChanged(this);
}

protected override void OnDisable()
{
// we call base OnDisable first here
// as we need to have the IsActive return the
// correct value when we notify the children
// that the mask state has changed.
base.OnDisable();
m_ClipTargets.Clear();
m_MaskableTargets.Clear();
m_Clippers.Clear();
ClipperRegistry.Unregister(this);
MaskUtilities.Notify2DMaskStateChanged(this);
}

首先,RectMask2D 会在 OnEnableOnDisable 方法中分别向 ClipperRegistry 注册与注销自己。同时,RectMask2D 会调用 MaskUtilities.Notify2DMaskStateChanged(this) 来通知所有的 MaskableGraphic 自己的状态发生了变化。

1
2
3
4
5
6
7
8
9
10
11
12
13
14
15
public static void Notify2DMaskStateChanged(Component mask)
{
var components = ListPool<Component>.Get();
mask.GetComponentsInChildren(components);
for (var i = 0; i < components.Count; i++)
{
if (components[i] == null || components[i].gameObject == mask.gameObject)
continue;

var toNotify = components[i] as IClippable;
if (toNotify != null)
toNotify.RecalculateClipping();
}
ListPool<Component>.Release(components);
}

该函数会遍历 RectMask2D 下的所有 IClippable 实例,并调用它们的 RecalculateClipping() 方法,用于重新计算遮罩状态。

PerformClipping

RectMask2D 会在 PerformClipping() 方法中完成对子物体的裁剪:

1
2
3
4
5
6
7
8
9
10
11
12
13
14
15
16
17
public virtual void PerformClipping()
{
// ...

if (m_ShouldRecalculateClipRects)
{
MaskUtilities.GetRectMasksForClip(this, m_Clippers);
m_ShouldRecalculateClipRects = false;
}

// get the compound rects from
// the clippers that are valid
bool validRect = true;
Rect clipRect = Clipping.FindCullAndClipWorldRect(m_Clippers, out validRect);

// ...
}

首先,RectMask2D 会收集父物体中的的所有 RectMask2D 对象,以确定其子物体要受到多少个裁剪框的裁剪;其次会通过 FindCullAndClipWorldRect() 方法找到所有裁剪框的交集,得到最终作用于子物体的裁剪框。这两个函数我们就不分析了,逻辑较为简单。需要注意的是,由于 RectMask2D 仅限于对子物体做长方形的裁剪,因此在计算交集时也仅会简单地计算出 AABB 包围盒,如果涉及到旋转等情况就很容易计算错误,这种情况最好自己实现一个 IClippable 接口。

1
2
3
4
5
6
// If the mask is in ScreenSpaceOverlay/Camera render mode, its content is only rendered when its rect
// overlaps that of the root canvas.
RenderMode renderMode = Canvas.rootCanvas.renderMode;
bool maskIsCulled =
(renderMode == RenderMode.ScreenSpaceCamera || renderMode == RenderMode.ScreenSpaceOverlay) &&
!clipRect.Overlaps(rootCanvasRect, true);

其次,会通过裁剪框与 Canvas 的包围盒是否有交集来判断是否需要裁剪,如果裁剪框位于 Canvas 之外,则无需进一步处理。

1
2
3
4
5
6
7
8
9
10
11
12
13
14
15
16
17
18
19
20
21
22
23
24
25
26
27
28
29
30
31
32
33
34
35
36
if (clipRect != m_LastClipRectCanvasSpace)
{
foreach (IClippable clipTarget in m_ClipTargets)
{
clipTarget.SetClipRect(clipRect, validRect);
}

foreach (MaskableGraphic maskableTarget in m_MaskableTargets)
{
maskableTarget.SetClipRect(clipRect, validRect);
maskableTarget.Cull(clipRect, validRect);
}
}
else if (m_ForceClip)
{
foreach (IClippable clipTarget in m_ClipTargets)
{
clipTarget.SetClipRect(clipRect, validRect);
}

foreach (MaskableGraphic maskableTarget in m_MaskableTargets)
{
maskableTarget.SetClipRect(clipRect, validRect);

if (maskableTarget.canvasRenderer.hasMoved)
maskableTarget.Cull(clipRect, validRect);
}
}
else
{
foreach (MaskableGraphic maskableTarget in m_MaskableTargets)
{
if (maskableTarget.canvasRenderer.hasMoved)
maskableTarget.Cull(clipRect, validRect);
}
}

最后会根据各种条件来遍历 m_ClipTargetsm_MaskableTargets,使用 clipRect 完成裁剪。

这里需要注意的是,RectMask2D 中维护了两个序列,分别用于存储 IClippableMaskableGraphic 对象。但实际上只对 MaskableGraphic 对象进行了完整的裁剪操作,即 SetClipRect()Cull() 两个方法都被调用,而 IClippable 对象仅仅调用了 SetClipRect() 方法。但实际上在 UGUI 中也只有 MaskableGraphic 实现了 IClippable 接口,因此在默认情况下 m_ClipTargets 应该是空的,不太明白这样设计的原因。

IClippable 对象的注册与注销

RectMask2D 中提供了两个方法用于注册与注销 IClippable 对象:

1
2
3
4
5
6
7
8
9
10
11
12
13
14
15
16
17
18
19
20
21
22
23
24
25
26
27
28
29
30
31
32
public void AddClippable(IClippable clippable)
{
if (clippable == null)
return;
m_ShouldRecalculateClipRects = true;
MaskableGraphic maskable = clippable as MaskableGraphic;

if (maskable == null)
m_ClipTargets.Add(clippable);
else
m_MaskableTargets.Add(maskable);

m_ForceClip = true;
}

public void RemoveClippable(IClippable clippable)
{
if (clippable == null)
return;

m_ShouldRecalculateClipRects = true;
clippable.SetClipRect(new Rect(), false);

MaskableGraphic maskable = clippable as MaskableGraphic;

if (maskable == null)
m_ClipTargets.Remove(clippable);
else
m_MaskableTargets.Remove(maskable);

m_ForceClip = true;
}

从这两个函数中也可以看出,如果传入的 clippable 对象是 MaskableGraphic 类型,则会被加入到 m_MaskableTargets 中,否则会被加入到 m_ClipTargets 中。此外,在注销时会调用 clippable.SetClipRect(new Rect(), false) 来清除裁剪框。

万物之终结 —— MaskableGraphic

前面铺垫了这么久,其实所有的功能都只是为了给 MaskableGraphic 提供两种遮罩的方式,现在就来看看 MaskableGraphic 是如何实现的吧。

成员变量

1
2
3
4
5
6
7
8
9
10
11
12
13
14
15
16
17
18
19
20
21
// m_Maskable is whether this graphic is allowed to be masked or not. It has the matching public property maskable.
// The default for m_Maskable is true, so graphics under a mask are masked out of the box.
// The maskable property can be turned off from script by the user if masking is not desired.
[NonSerialized]
private bool m_Maskable = true;

/// <summary>
/// Does this graphic allow masking.
/// </summary>
public bool maskable
{
get { return m_Maskable; }
set
{
if (value == m_Maskable)
return;
m_Maskable = value;
m_ShouldRecalculateStencil = true;
SetMaterialDirty();
}
}

首先,定义了一个 m_Maskable 变量用于标识该 MaskableGraphic 是否可以被遮罩。这个变量可以通过 maskable 属性进行设置。如果 m_Maskablefalse 的话则无论哪种遮罩都不会对其生效。

1
2
3
4
5
6
7
8
9
10
11
12
13
14
15
16
17
18
19
[Serializable]
public class CullStateChangedEvent : UnityEvent<bool> {}

// Event delegates triggered on click.
[SerializeField]
private CullStateChangedEvent m_OnCullStateChanged = new CullStateChangedEvent();

/// <summary>
/// Callback issued when culling changes.
/// </summary>
/// <remarks>
/// Called whene the culling state of this MaskableGraphic either becomes culled or visible. You can use this to control other elements
/// of your UI as culling happens.
/// </remarks>
public CullStateChangedEvent onCullStateChanged
{
get { return m_OnCullStateChanged; }
set { m_OnCullStateChanged = value; }
}

其次定义了一个 CullStateChangedEvent 事件,用于在裁剪状态发生变化时被触发。这个事件在 Cull() 方法中会被调用。

IClippable 接口实现

1
2
3
4
5
6
7
8
9
10
11
12
13
14
15
16
public virtual void Cull(Rect clipRect, bool validRect)
{
var cull = !validRect || !clipRect.Overlaps(rootCanvasRect, true);
UpdateCull(cull);
}

private void UpdateCull(bool cull)
{
if (canvasRenderer.cull != cull)
{
canvasRenderer.cull = cull;
UISystemProfilerApi.AddMarker("MaskableGraphic.cullingChanged", this);
m_OnCullStateChanged.Invoke(cull);
OnCullingChanged();
}
}

Cull() 用于判断当前的裁剪框是否需要被剔除,如果裁剪框与 Canvas 的包围盒没有交集,则不会渲染所有的物体,并且会触发相应的回调。

1
2
3
4
5
6
7
8
9
10
/// <summary>
/// See IClippable.SetClipRect
/// </summary>
public virtual void SetClipRect(Rect clipRect, bool validRect)
{
if (validRect)
canvasRenderer.EnableRectClipping(clipRect); // 真正完成裁剪的地方
else
canvasRenderer.DisableRectClipping();
}

SetClipRect() 方法则是用于设置裁剪框,如果 validRecttrue 则会调用 canvasRenderer.EnableRectClipping(clipRect) 将裁剪框传递给 canvasRenderer,完成裁剪的设置。

1
2
3
4
5
6
7
8
9
10
11
12
13
14
15
16
17
18
19
20
21
22
23
24
25
private void UpdateClipParent()
{
var newParent = (maskable && IsActive()) ? MaskUtilities.GetRectMaskForClippable(this) : null;

// if the new parent is different OR is now inactive
if (m_ParentMask != null && (newParent != m_ParentMask || !newParent.IsActive()))
{
m_ParentMask.RemoveClippable(this);
UpdateCull(false);
}

// don't re-add it if the newparent is inactive
if (newParent != null && newParent.IsActive())
newParent.AddClippable(this);

m_ParentMask = newParent;
}

/// <summary>
/// See IClippable.RecalculateClipping
/// </summary>
public virtual void RecalculateClipping()
{
UpdateClipParent();
}

RecalculateClipping() 的实现中,首先会调用 MaskUtilities.GetRectMaskForClippable() 方法来获取当前 MaskableGraphic 的父 RectMask2D 对象,然后会调用相应的 AddClippable()RemoveClippable() 方法来将自身注册进父 RectMask2D 对象中或注销自身。

IMaskable 接口实现

由于 Stencil Buffer 方式的 Mask 需要通过 IMaterialModifier 接口来实现,因此 MaskableGraphic 也需要实现这个接口。

1
2
3
4
5
6
7
8
9
10
11
12
13
14
15
16
17
18
19
20
21
22
23
24
25
public virtual Material GetModifiedMaterial(Material baseMaterial)
{
var toUse = baseMaterial;

if (m_ShouldRecalculateStencil)
{
var rootCanvas = MaskUtilities.FindRootSortOverrideCanvas(transform);
m_StencilValue = maskable ? MaskUtilities.GetStencilDepth(transform, rootCanvas) : 0;
m_ShouldRecalculateStencil = false;
}

// if we have a enabled Mask component then it will
// generate the mask material. This is an optimisation
// it adds some coupling between components though :(
Mask maskComponent = GetComponent<Mask>();
if (m_StencilValue > 0 && (maskComponent == null || !maskComponent.IsActive()))
{
var maskMat = StencilMaterial.Add(toUse, (1 << m_StencilValue) - 1, StencilOp.Keep, CompareFunction.Equal,
ColorWriteMask.All, (1 << m_StencilValue) - 1, 0);
StencilMaterial.Remove(m_MaskMaterial);
m_MaskMaterial = maskMat;
toUse = m_MaskMaterial;
}
return toUse;
}

UGUI 对于 Stencil Buffer 中 Ref 数值的设置逻辑在 上一篇文章 中已经分析过了,这里不再赘述。可以看到,在默认情况下(Graphic 没有挂载 Mask 组件),会将 StencilID 设置为与父物体相同的值且 Keep StencilBuffer 中的值,这意味着该物体将只会在父物体的遮罩范围内显示,从而实现遮罩的效果。

1
2
3
4
5
6
7
8
9
public virtual void RecalculateMasking()
{
// Remove the material reference as either the graphic of the mask has been enable/ disabled.
// This will cause the material to be repopulated from the original if need be. (case 994413)
StencilMaterial.Remove(m_MaskMaterial);
m_MaskMaterial = null;
m_ShouldRecalculateStencil = true;
SetMaterialDirty();
}

对于 IMaskable 接口的实现则十分简单,仅仅需要移除当前的 mask 材质并对材质进行重新计算即可。从这里也可以看出,IMaskable 接口确实需要与 IMaterialModifier 接口配合使用,才能完成遮罩的功能。

RecalculateClipping 及 RecalculateMasking 的调用时机

RecalculateClipping()RecalculateMasking() 方法都是用于重新计算遮罩的状态,让我们来研究一下这两个方法的调用时机。

1
2
3
4
5
6
7
8
9
10
11
12
13
14
15
16
17
18
19
20
21
22
23
24
25
26
27
28
29
30
31
public static void Notify2DMaskStateChanged(Component mask)
{
var components = ListPool<Component>.Get();
mask.GetComponentsInChildren(components);
for (var i = 0; i < components.Count; i++)
{
if (components[i] == null || components[i].gameObject == mask.gameObject)
continue;

var toNotify = components[i] as IClippable;
if (toNotify != null)
toNotify.RecalculateClipping();
}
ListPool<Component>.Release(components);
}

public static void NotifyStencilStateChanged(Component mask)
{
var components = ListPool<Component>.Get();
mask.GetComponentsInChildren(components);
for (var i = 0; i < components.Count; i++)
{
if (components[i] == null || components[i].gameObject == mask.gameObject)
continue;

var toNotify = components[i] as IMaskable;
if (toNotify != null)
toNotify.RecalculateMasking();
}
ListPool<Component>.Release(components);
}

MaskUtilities 类中提供了两个静态方法 Notify2DMaskStateChanged()NotifyStencilStateChanged(),用于重新计算一个 mask 下所有子物体的遮罩状态。

1
2
3
4
5
6
7
8
9
10
11
12
13
14
15
16
17
18
19
20
21
22
23
24
25
26
27
28
29
30
31
32
33
// RectMask2D.cs

protected override void OnEnable()
{
base.OnEnable();
m_ShouldRecalculateClipRects = true;
ClipperRegistry.Register(this);
MaskUtilities.Notify2DMaskStateChanged(this);
}

protected override void OnDisable()
{
base.OnDisable();
m_ClipTargets.Clear();
m_MaskableTargets.Clear();
m_Clippers.Clear();
ClipperRegistry.Unregister(this);
MaskUtilities.Notify2DMaskStateChanged(this);
}

#if UNITY_EDITOR
protected override void OnValidate()
{
base.OnValidate();
m_ShouldRecalculateClipRects = true;

if (!IsActive())
return;

MaskUtilities.Notify2DMaskStateChanged(this);
}

#endif

对于 RectMask2D 来说,会在 OnEnable()OnDisable() 方法中调用 Notify2DMaskStateChanged() 方法,用于重新计算所有子物体的裁剪状态。而在 OnValidate() 方法中也会调用该方法,用于在编辑器中实时更新遮罩状态。

1
2
3
4
5
6
7
8
9
10
11
12
13
14
15
16
17
18
19
20
21
22
23
24
25
26
27
28
29
30
31
32
33
34
35
36
37
38
39
40
41
42
43
44
45
46
// Mask.cs
protected override void OnEnable()
{
base.OnEnable();
if (graphic != null)
{
graphic.canvasRenderer.hasPopInstruction = true;
graphic.SetMaterialDirty();
}

MaskUtilities.NotifyStencilStateChanged(this);
}

protected override void OnDisable()
{
base.OnDisable();
if (graphic != null)
{
graphic.SetMaterialDirty();
graphic.canvasRenderer.hasPopInstruction = false;
graphic.canvasRenderer.popMaterialCount = 0;
}

StencilMaterial.Remove(m_MaskMaterial);
m_MaskMaterial = null;
StencilMaterial.Remove(m_UnmaskMaterial);
m_UnmaskMaterial = null;

MaskUtilities.NotifyStencilStateChanged(this);
}

#if UNITY_EDITOR
protected override void OnValidate()
{
base.OnValidate();

if (!IsActive())
return;

if (graphic != null)
graphic.SetMaterialDirty();

MaskUtilities.NotifyStencilStateChanged(this);
}

#endif

对于 Mask 来说,逻辑也是类似的。但与 RectMask2D 不同的是,MaskableGraphic 也会在 OnEnable()OnDisable() 方法中调用 NotifyStencilStateChanged()

1
2
3
4
5
6
7
8
9
10
11
12
13
14
15
16
17
18
19
20
21
22
23
24
25
26
27
protected override void OnEnable()
{
base.OnEnable();
m_ShouldRecalculateStencil = true;
UpdateClipParent();
SetMaterialDirty();

if (GetComponent<Mask>() != null)
{
MaskUtilities.NotifyStencilStateChanged(this);
}
}

protected override void OnDisable()
{
base.OnDisable();
m_ShouldRecalculateStencil = true;
SetMaterialDirty();
UpdateClipParent();
StencilMaterial.Remove(m_MaskMaterial);
m_MaskMaterial = null;

if (GetComponent<Mask>() != null)
{
MaskUtilities.NotifyStencilStateChanged(this);
}
}

这就涉及到 RectMask2DMask 的核心区别了:由于 Mask 依赖于 Graphic 组件来设置材质,因此 MaskableGraphic 的启用与否也会影响到 Mask 的遮罩状态,因此需要在 MaskableGraphicOnEnable()OnDisable() 方法中也调用 NotifyStencilStateChanged() 来重新计算遮罩状态。而 RectMask2D 仅依赖于 RectTransform 组件,起作用的原理与 Graphic 组件无关,因此 Graphic 组件的状态并不会影响到 RectMask2D,即使禁用了 Graphic 组件,RectMask2D 依旧生效

总结

mask.png

至此,我们就分析完了 UGUI 中的遮罩功能的实现。在 UGUI 中,有两种实现遮罩的方式:MaskRectMask2DMask 在模板测试阶段起作用,通过修改 Stencil Buffer 的值来实现遮罩,这一功能是通过给 Graphic 组件设置不同的材质来实现的,因此 Mask 依赖于 Graphic 组件,且会产生额外的 Draw Call;而 RectMask2D 在裁剪测试阶段起作用,通过设置 CanvasRenderer 的裁剪框来实现遮罩,RectMask2D 仅依赖于 RectTransform 组件,因此不会产生额外的 Draw Call,但只适用于 2D 且共面的场景。

就接口间的关系来看,CanvasUpdateRegistry 会在 Layout 阶段之后调用 ClipperRegistryCull() 方法,来完成裁剪的操作。IClipper 会将自身注册到 ClipperRegistry 中以生效;而在 Render 阶段,Graphic 会在 Rebuild() 方法中调用 UpdateMaterial() 方法来更新材质,这一过程会调用 IMaskable.GetModifiedMaterial() 方法来完成对材质的修改,从而实现遮罩的效果。

MaskableGraphic 派生自 Graphic 组件,实现了 IClippableIMaskable (以及 IMaterialModifier)接口,用于支持 RectMask2DMask 的遮罩功能。分析到这里,我们已经距离实际的 UGUI 组件非常接近了,RawImageImage 等组件均直接继承自 MaskableGraphic