前言
经过前面数篇文章的分析,现在我们已经对 UGUI 的布局以及渲染过程有了一定的了解,也分析了 Image 以及 Text 等显示类组件的实现。但 UI 元素除了排版与显示外,最重要的功能便是交互了。我们在 EventSystem 中介绍了 UGUI 接受以及处理事件的流程。那么,具体的 UI 元素又该如何接收事件以及按照各自的逻辑处理呢?
这个故事还得从 Selectable 说起。
Selectable
Selectable 是 UGUI 中所有可交互元素的基类,实现了包括 IMoveHandler、IPointerXXXHandler、ISelectHandler 等接口,用于处理各种基本的交互事件。以此派生出的 UI 组件只需要再实现自己独特的 Handle 接口即可。
Selectable 的成员变量
为了维护可选中物体的状态以及交互逻辑,UGUI 定义了一些结构体以及枚举类,这些数据都会在 Selectable 的逻辑处理中用到。
1
2
3
4
5
6
7
8
9
10
11
12
13
14
private Navigation m_Navigation = Navigation.defaultNavigation;private Transition m_Transition = Transition.ColorTint;private ColorBlock m_Colors = ColorBlock.defaultColorBlock;private SpriteState m_SpriteState;private AnimationTriggers m_AnimationTriggers = new AnimationTriggers();private Graphic m_TargetGraphic;private static Selectable[] s_Selectables = new Selectable[10 ];private static int s_SelectableCount = 0 ;
Navigation
Navigation 结构体用于定义可选中物体的导航逻辑,存放了导航模式以及四个方向的导航目标。这一功能主要在输入为手柄或键盘时使用,通过摇杆或键盘的方向键就可以切换选中的按钮,靠的就是 Navigation。
1
2
3
4
5
6
7
8
9
10
11
12
13
14
15
16
17
18
19
20
21
22
23
24
25
26
27
public struct Navigation : IEquatable<Navigation>{ public enum Mode { None = 0 , Horizontal = 1 , Vertical = 2 , Automatic = 3 , Explicit = 4 , } private Mode m_Mode; private Selectable m_SelectOnUp; private Selectable m_SelectOnDown; private Selectable m_SelectOnLeft; private Selectable m_SelectOnRight; }
Mode 枚举类定义了导航的模式,如垂直方向及水平方向等,m_SelectOnXXX 则是四个方向的导航目标。当导航模式为 Explicit 时,需要手动指定这四个目标。其他情况会由 UGUI 自动计算出最合适的目标。
Transition
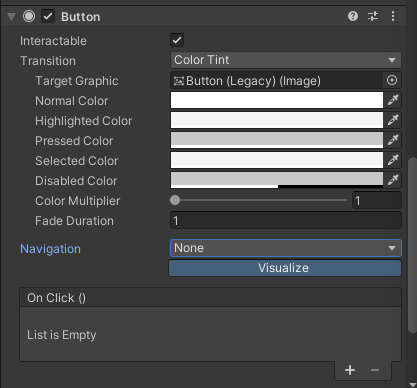
Transition 枚举类定义了可选中物体的状态切换方式,包括颜色变化、Sprite 变化、动画等。在 UI 中经常会看到按钮按下时颜色变化的效果,这就是通过 Transition 实现的。
1
2
3
4
5
6
7
8
9
10
public enum Transition{ None, ColorTint, SpriteSwap, Animation }
ColorBlock
ColorBlock 结构体定义了可选中物体在不同状态下的颜色,包括普通状态、高亮状态、按下状态、禁用状态。这些颜色会在 Transition 为 ColorTint 时生效。
1
2
3
4
5
6
7
8
9
10
11
12
13
14
15
16
17
18
19
20
21
22
23
24
25
26
27
28
29
30
31
32
33
34
35
36
public struct ColorBlock : IEquatable<ColorBlock>{ private Color m_NormalColor; private Color m_HighlightedColor; private Color m_PressedColor; private Color m_SelectedColor; private Color m_DisabledColor; private float m_ColorMultiplier; private float m_FadeDuration; public static ColorBlock defaultColorBlock { get { var c = new ColorBlock { m_NormalColor = new Color32(255 , 255 , 255 , 255 ), m_HighlightedColor = new Color32(245 , 245 , 245 , 255 ), m_PressedColor = new Color32(200 , 200 , 200 , 255 ), m_SelectedColor = new Color32(245 , 245 , 245 , 255 ), m_DisabledColor = new Color32(200 , 200 , 200 , 128 ), colorMultiplier = 1.0f , fadeDuration = 0.1f }; return c; } } }
defaultColorBlock 用于返回一个默认的颜色配置,挺好看 。
SpriteState
SpriteState 结构体定义了可选中物体在不同状态下的 Sprite。与 ColorBlock 类似,这些 Sprite 会在 Transition 为 SpriteSwap 时生效。
1
2
3
4
5
6
7
8
9
10
11
12
13
14
15
16
17
public struct SpriteState : IEquatable<SpriteState>{ [SerializeField ] private Sprite m_HighlightedSprite; [SerializeField ] private Sprite m_PressedSprite; [FormerlySerializedAs("m_HighlightedSprite" ) ] [SerializeField ] private Sprite m_SelectedSprite; [SerializeField ] private Sprite m_DisabledSprite; }
AnimationTriggers
AnimationTriggers 结构体定义了可选中物体在不同状态下的动画触发器。这些动画会在 Transition 为 Animation 时生效。
1
2
3
4
5
6
7
8
9
10
public class AnimationTriggers { private const string kDefaultNormalAnimName = "Normal" ; private const string kDefaultHighlightedAnimName = "Highlighted" ; private const string kDefaultPressedAnimName = "Pressed" ; private const string kDefaultSelectedAnimName = "Selected" ; private const string kDefaultDisabledAnimName = "Disabled" ; }
AnimationTriggers 需要配合 Animator 使用,用于播放不同状态下的动画。
targetGraphic
在 UGUI 中,选中物体是通过射线检测来实现的。一个按钮不能凭空被选中,必须有一个可见的 Graphic 组件作为目标。targetGraphic 就是用于存放这个目标的。
1
2
3
4
5
protected override void Awake (){ if (m_TargetGraphic == null ) m_TargetGraphic = GetComponent<Graphic>(); }
在 Awake() 方法中,如果没有指定 targetGraphic,则会自动获取当前 GameObject 上的 Graphic 组件。
s_Selectables
s_Selectables 中存放了场景中所有的可交互元素,Selectable 会在 OnEnable() 时将自己添加到这个数组中。s_Selectable 会在计算导航目标时使用。
1
2
3
4
5
6
7
8
9
10
11
12
13
14
15
16
17
18
19
protected override void OnEnable (){ base .OnEnable(); if (s_IsDirty) RemoveInvalidSelectables(); m_WillRemove = false ; if (s_SelectableCount == s_Selectables.Length) { Selectable[] temp = new Selectable[s_Selectables.Length * 2 ]; Array.Copy(s_Selectables, temp, s_Selectables.Length); s_Selectables = temp; } s_Selectables[s_SelectableCount++] = this ; isPointerDown = false ; DoStateTransition(currentSelectionState, true ); }
RemoveInvalidSelectables() 方法用于移除无效的 Selectable 组件。
1
2
3
4
5
6
7
8
9
10
private static void RemoveInvalidSelectables (){ for (int i = s_SelectableCount - 1 ; i >= 0 ; --i) { if (s_Selectables[i] == null || s_Selectables[i].m_WillRemove) s_Selectables[i] = s_Selectables[--s_SelectableCount]; } s_IsDirty = false ; }
Selectable 的状态切换过程
Selectable 中处理了基本的状态切换逻辑,以在用户输入时维护好上述的各种成员变量,但 Selectable 本身并没有做额外的逻辑处理。
切换状态由 DoStateTransition() 方法实现:
1
2
3
4
5
6
7
8
9
10
11
12
13
14
15
16
17
18
19
20
21
22
23
24
25
26
27
28
29
30
31
32
33
34
35
36
37
38
39
40
41
42
43
44
45
46
47
48
49
50
51
52
53
54
55
56
protected virtual void DoStateTransition (SelectionState state, bool instant ){ if (!gameObject.activeInHierarchy) return ; Color tintColor; Sprite transitionSprite; string triggerName; switch (state) { case SelectionState.Normal: tintColor = m_Colors.normalColor; transitionSprite = null ; triggerName = m_AnimationTriggers.normalTrigger; break ; case SelectionState.Highlighted: tintColor = m_Colors.highlightedColor; transitionSprite = m_SpriteState.highlightedSprite; triggerName = m_AnimationTriggers.highlightedTrigger; break ; case SelectionState.Pressed: tintColor = m_Colors.pressedColor; transitionSprite = m_SpriteState.pressedSprite; triggerName = m_AnimationTriggers.pressedTrigger; break ; case SelectionState.Selected: tintColor = m_Colors.selectedColor; transitionSprite = m_SpriteState.selectedSprite; triggerName = m_AnimationTriggers.selectedTrigger; break ; case SelectionState.Disabled: tintColor = m_Colors.disabledColor; transitionSprite = m_SpriteState.disabledSprite; triggerName = m_AnimationTriggers.disabledTrigger; break ; default : tintColor = Color.black; transitionSprite = null ; triggerName = string .Empty; break ; } switch (m_Transition) { case Transition.ColorTint: StartColorTween(tintColor * m_Colors.colorMultiplier, instant); break ; case Transition.SpriteSwap: DoSpriteSwap(transitionSprite); break ; case Transition.Animation: TriggerAnimation(triggerName); break ; } }
该函数会根据传入的 SelectionState 参数,切换 tinColor、transitionSprite 以及 triggerName。然后根据 Transition 的不同,执行不同的状态切换逻辑。
1
2
3
4
5
6
7
void StartColorTween (Color targetColor, bool instant ){ if (m_TargetGraphic == null ) return ; m_TargetGraphic.CrossFadeColor(targetColor, instant ? 0f : m_Colors.fadeDuration, true , true ); }
值得注意的是,instant 参数用于控制是否立即切换状态,该参数只会影响颜色变化的速度,如果 instant 为 true,则颜色变化会立即生效,否则会根据 fadeDuration 逐渐变化。
Selectable 的交互逻辑
1
2
3
4
5
6
7
private void EvaluateAndTransitionToSelectionState (){ if (!IsActive() || !IsInteractable()) return ; DoStateTransition(currentSelectionState, false ); }
DoStateTransition() 方法加上一些状态判断就被包装为了 EvaluateAndTransitionToSelectionState()。该函数会被 Selectable 所实现的各种接口调用,用于处理不同的输入。
1
2
3
4
5
6
7
8
9
10
11
12
13
14
15
16
17
18
19
20
21
22
23
24
25
26
27
28
29
30
31
32
33
34
35
36
37
public virtual void OnPointerDown (PointerEventData eventData ){ if (eventData.button != PointerEventData.InputButton.Left) return ; if (IsInteractable() && navigation.mode != Navigation.Mode.None && EventSystem.current != null ) EventSystem.current.SetSelectedGameObject(gameObject, eventData); isPointerDown = true ; EvaluateAndTransitionToSelectionState(); } public virtual void OnPointerUp (PointerEventData eventData ){ if (eventData.button != PointerEventData.InputButton.Left) return ; isPointerDown = false ; EvaluateAndTransitionToSelectionState(); } public virtual void OnPointerEnter (PointerEventData eventData ){ isPointerInside = true ; EvaluateAndTransitionToSelectionState(); } public virtual void Select (){ if (EventSystem.current == null || EventSystem.current.alreadySelecting) return ; EventSystem.current.SetSelectedGameObject(gameObject); }
Selectable 对这些事件都只是做了简单的状态切换,具体的逻辑处理需要由派生类实现。比较特别的是 Select() 方法,该方法会将当前 GameObject 设为 EventSystem 的选中物体。
IMoveHandler 的实现
IMoveHandler 接口用于处理来自键盘或手柄的移动事件。由于需要更新导航目标,因此 Selectable 对于 OnMove() 的实现就比较复杂。这里单独分析一下:
1
2
3
4
5
6
7
8
9
10
11
12
13
14
15
16
17
18
19
20
21
22
23
24
25
26
27
28
29
30
31
32
33
34
35
36
37
38
39
40
41
42
43
44
45
public Selectable FindSelectable (Vector3 dir ){ dir = dir.normalized; Vector3 localDir = Quaternion.Inverse(transform.rotation) * dir; Vector3 pos = transform.TransformPoint(GetPointOnRectEdge(transform as RectTransform, localDir)); float maxScore = Mathf.NegativeInfinity; Selectable bestPick = null ; if (s_IsDirty) RemoveInvalidSelectables(); for (int i = 0 ; i < s_SelectableCount; ++i) { Selectable sel = s_Selectables[i]; if (sel == this ) continue ; if (!sel.IsInteractable() || sel.navigation.mode == Navigation.Mode.None) continue ; #if UNITY_EDITOR if (Camera.current != null && !UnityEditor.SceneManagement.StageUtility.IsGameObjectRenderedByCamera(sel.gameObject, Camera.current)) continue ; #endif var selRect = sel.transform as RectTransform; Vector3 selCenter = selRect != null ? (Vector3)selRect.rect.center : Vector3.zero; Vector3 myVector = sel.transform.TransformPoint(selCenter) - pos; float dot = Vector3.Dot(dir, myVector); if (dot <= 0 ) continue ; float score = dot / myVector.sqrMagnitude; if (score > maxScore) { maxScore = score; bestPick = sel; } } return bestPick; }
FindSelectable() 方法用于查找在给定方向上最近的可选中物体。该方法会遍历场景中所有的 Selectable 对象,并选出最优的那个。函数中同时考虑到了方向的一致性以及距离的远近。
设查询方向为 d 1 d_1 d 1 d 2 d_2 d 2 s s s
score = d 1 ⋅ d 2 s 2 \text{score} = \frac{d_1 \cdot d_2}{s^2}
score = s 2 d 1 ⋅ d 2
即方向越一致且距离越近的物体得分越高。
1
2
3
4
5
6
7
8
9
10
11
12
13
14
15
16
17
18
19
20
21
22
23
24
25
26
27
28
29
public virtual Selectable FindSelectableOnLeft (){ if (m_Navigation.mode == Navigation.Mode.Explicit) { return m_Navigation.selectOnLeft; } if ((m_Navigation.mode & Navigation.Mode.Horizontal) != 0 ) { return FindSelectable(transform.rotation * Vector3.left); } return null ; } public virtual Selectable FindSelectableOnRight (){ if (m_Navigation.mode == Navigation.Mode.Explicit) { return m_Navigation.selectOnRight; } if ((m_Navigation.mode & Navigation.Mode.Horizontal) != 0 ) { return FindSelectable(transform.rotation * Vector3.right); } return null ; } public virtual Selectable FindSelectableOnUp ()public virtual Selectable FindSelectableOnDown ()
接下来的四个函数分别用于寻找四个方向的导航目标。如果导航模式为 Explicit,则直接返回指定的目标,否则调用 FindSelectable() 方法计算。
1
2
3
4
5
6
7
8
9
10
11
12
13
14
15
16
17
18
19
20
21
22
23
24
25
26
27
public virtual void OnMove (AxisEventData eventData ){ switch (eventData.moveDir) { case MoveDirection.Right: Navigate(eventData, FindSelectableOnRight()); break ; case MoveDirection.Up: Navigate(eventData, FindSelectableOnUp()); break ; case MoveDirection.Left: Navigate(eventData, FindSelectableOnLeft()); break ; case MoveDirection.Down: Navigate(eventData, FindSelectableOnDown()); break ; } } void Navigate (AxisEventData eventData, Selectable sel ){ if (sel != null && sel.IsActive()) eventData.selectedObject = sel.gameObject; }
最终的接口函数 OnMove() 会根据 eventData.moveDir 的值调用相应的寻找函数,并调用 Navigate() 方法将找到的目标设为当前选中物体。
小结
Selectable 是 UGUI 中所有可交互元素的基类,类中维护了一系列的变量以标识目前物体的选中状态,如 Navigation、Transition、ColorBlock 等。同时,Selectable 也实现了一些基本的交互接口,如 IMoveHandler、IPointerXXXHandler 等,但在相应的处理函数中只是简单地切换状态,具体的逻辑处理需要由派生类实现。Selectable 中还实现了基本的导航功能,可以寻找指定方向的最近的可选中物体。
Button
Button 也是 UGUI 中一个比较常用的组件。为一个 GameObject 添加 Button 组件后,该 GameObject 就可以响应点击事件。
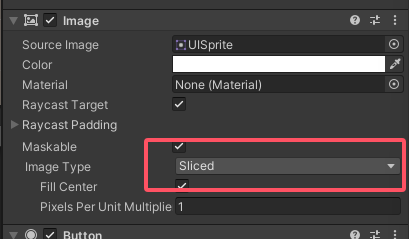
在添加 Button 组件后,Unity 会自动为该 GameObject 添加一个 Image 组件作为按钮的背景,并在子物体中添加一个 Text 组件作为按钮的文本。值得注意的是 Image Type 被指定为 Sliced,这样可以保证按钮在拉伸时不会失真。
事件的触发
一般来说,我们在点击按钮时总希望触发一些逻辑,比如开启或关闭某个界面、播放音效等。在 Button 中提供了一个 onClick 事件,我们可以向其中注册一个回调函数,当按钮被点击时,该回调函数就会被调用。
1
2
3
4
5
6
7
8
9
10
11
12
13
14
15
16
17
18
public class ButtonClickedEvent : UnityEvent {}private ButtonClickedEvent m_OnClick = new ButtonClickedEvent();public ButtonClickedEvent onClick{ get { return m_OnClick; } set { m_OnClick = value ; } } private void Press (){ if (!IsActive() || !IsInteractable()) return ; UISystemProfilerApi.AddMarker("Button.onClick" , this ); m_OnClick.Invoke(); }
Press() 方法用于处理按钮被点击时的逻辑,其中会调用 m_OnClick.Invoke() 触发 onClick 事件。
1
2
3
4
5
6
7
8
9
10
11
12
13
14
15
16
17
18
19
20
21
22
23
24
25
26
27
28
29
30
31
32
33
34
35
36
37
public class Button : Selectable , IPointerClickHandler , ISubmitHandler { public virtual void OnPointerClick (PointerEventData eventData ) { if (eventData.button != PointerEventData.InputButton.Left) return ; Press(); } public virtual void OnSubmit (BaseEventData eventData ) { Press(); if (!IsActive() || !IsInteractable()) return ; DoStateTransition(SelectionState.Pressed, false ); StartCoroutine(OnFinishSubmit()); } private IEnumerator OnFinishSubmit () { var fadeTime = colors.fadeDuration; var elapsedTime = 0f ; while (elapsedTime < fadeTime) { elapsedTime += Time.unscaledDeltaTime; yield return null ; } DoStateTransition(currentSelectionState, false ); } }
Button 实现了 IPointerClickHandler 和 ISubmitHandler 接口,用于处理点击事件和提交事件。其中前者用于鼠标的点击而后者用于键盘或手柄的按键输入。在 OnPointerClick() 和 OnSubmit() 中都会调用 Press() 方法,触发按钮的点击事件。
由于 Button 继承自 Selectable,因此状态的维护以及导航都不用额外处理,只需要关注点击事件的触发即可。
UGUI 中事件检测的实现过程
由用户的点击输入到 Button 组件的响应,中间经历了一系列的事件检测过程。我们来简单回顾一下:
EventSystem
正如 UGUI 的显示过程均起源于 CanvasUpdateRegistry,事件检测的过程也是从 EventSystem 开始的。EventSystem 会在每一帧中调用 Update() 方法,更新当前的 InputModule,并调用 Process() 方法处理输入事件。
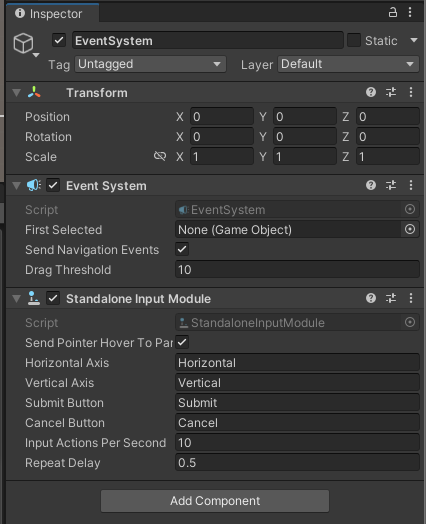
当我们在场景中新建一个 Canvas 时,Unity 会自动为我们添加一个 EventSystem,并在其中添加一个 StandaloneInputModule 作为输入模块。
StandaloneInputModule
在 StandaloneInputModule 的 Process() 方法中,会依次调用 ProcessTouchEvents() 以及 ProcessMouseEvent() 方法处理触摸事件和鼠标事件。
Raycast
EventSystem 会通过射线检测找到当前点击的物体,具体的调用时机位于 PointerInputModule.GetMousePointerEventData() 方法中。通过射线检测即可得到当前点击的物体,EventSystem 会将鼠标的数据以及射线检测的数据全部打包封装为一个 MouseState 对象。
EventHandle
得到了当前点击的物体后,InputModule 会调用 ExecuteEvents.ExecuteHierarchy() 等泛型方法,分别处理不同类型的事件。在 Button 组件中,需要处理的则是 OnPointerClick() 以及 OnSubmit() 事件。执行时则会调用我们注册进 onClick 事件的回调函数,从而实现按钮的点击响应。