前言
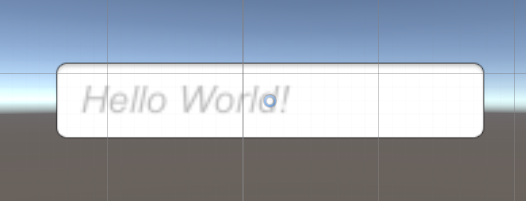
输入框 InputField 也是 UGUI 中较为常见的组件,经常被用于设置用户名、密码以及聊天框等。由于需要处理各种输入情况,因此 InputField 的代码量巨大,足足达到了 3000 行。这其中的大部分代码都用于处理输入时的细节,如对不同类型输入的限制、光标的显示、拖拽选中区域等。作为研究 UGUI 机制的系列文章,我们大可不必深入研究这些细节,只需要了解 InputField 对于不同的事件是如何处理的即可。
InputField 的属性
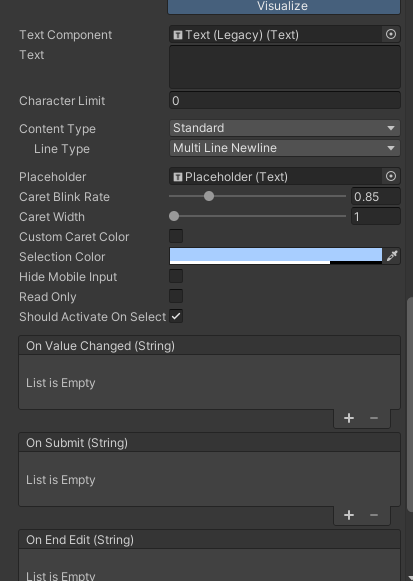
InputField 有非常多的可配置属性,对上述各属性的解释如下:
Text Component :文本组件,也就是显示输入所用到的 Text 组件
Text :文本内容
Character Limit :字符长度限制
Content Type :内容类型(数字、邮箱、字母、密码共十种类型选择)
Standard:标准,允许所有字符
Autocorrected:自动纠正,允许所有字符,但会自动纠正(针对某些平台)
Integer Number:整数,只允许输入数字
Decimal Number:小数,只允许输入数字和小数点
Alphanumeric:字母及数字,允许输入 A-Z、a-z、0-9
Name:姓名,强制首字母大写
Email Address:邮箱,允许输入邮箱格式
Password:密码,在显示时会使用星号代替密码内容
Pin:PIN码,只允许输入数字,同样会使用星号代替
Custom:自定义,可以自定义输入规则
InputField 的复杂程度由 ContentType 就可见一斑,处理上述的多种不同情况本身就已经非常复杂。
Line Type :行类型(单行、多行)
Placeholder :占位Text组件,当无内容时显示该组件(如“请输入内容”)
Caret Blink Rate :光标闪烁频率
Caret Width :光标宽度
CustomCaretColor :自定义光标颜色开关
Selection Color :选中区域颜色
Hide Mobile Input:隐藏输入框开关
On Value Changed:文本发生变化的事件监听
On Submit:提交文本的事件监听
On End Edit :完成编辑的事件监听
InputField 的生命周期函数
1
2
3
4
5
6
7
8
9
10
11
public class InputField : Selectable , IUpdateSelectedHandler , IBeginDragHandler , IDragHandler , IEndDragHandler , IPointerClickHandler , ISubmitHandler , ICanvasElement , ILayoutElement {}
由定义来看,InputField 继承自 Selectable,并且实现了诸多事件处理接口。
OnEnable1 2 3 4 5 6 7 8 9 10 11 12 13 14 15 16 17 18 19 20 protected override void OnEnable (){ base .OnEnable(); if (m_Text == null ) m_Text = string .Empty; m_DrawStart = 0 ; m_DrawEnd = m_Text.Length; if (m_CachedInputRenderer != null ) m_CachedInputRenderer.SetMaterial(m_TextComponent.GetModifiedMaterial(Graphic.defaultGraphicMaterial), Texture2D.whiteTexture); if (m_TextComponent != null ) { m_TextComponent.RegisterDirtyVerticesCallback(MarkGeometryAsDirty); m_TextComponent.RegisterDirtyVerticesCallback(UpdateLabel); m_TextComponent.RegisterDirtyMaterialCallback(UpdateCaretMaterial); UpdateLabel(); } }
InputField 的 Enable 阶段主要是初始化一些变量以及向 Text 组件中注册一些顶点以及材质更新时的回调函数。
这里调用了 base.OnEnable(),不知道各位是否还记得 Selectable.OnEnable() 中做了哪些事情?其实就是将自身注册到静态的 s_Selectables 列表中,以用于导航事件。可以参考 Selectable 。
其次就是三个被注册的函数了:
MarkGeometryAsDirty & UpdateCaretMaterialMarkGeometryAsDirty() 是 Text 组件在几何信息更新时的回调。大家可以思考一下,一个输入框应该负责哪些内容的几何信息更新?我们已知文本内容本身的几何信息更新由 Text 组件负责,背景等图片的几何信息更新由 Image 组件负责,那么 InputField 负责的是什么呢?
答案就是 ———— 光标(Caret)。
没错,InputField 本身所负责的就只有光标的更新。因此无论是在几何信息更新的回调中还是在材质更新的回调中,我们都只会看到光标的相关操作。(当然还需要处理输入的文字)。
1 2 3 4 5 6 7 8 9 10 11 12 13 14 private void MarkGeometryAsDirty (){ CanvasUpdateRegistry.RegisterCanvasElementForGraphicRebuild(this ); } public virtual void Rebuild (CanvasUpdate update ) { switch (update) { case CanvasUpdate.LatePreRender: UpdateGeometry(); break ; } }
可以看到,在 MarkGeometryAsDirty() 中,仅仅是将自身重新注册进 CanvasUpdateRegistry 中,以便在下一帧的 LatePreRender 阶段更新几何信息。而 Rebuild() 中则调用了 UpdateGeometry() 函数。
1 2 3 4 5 6 7 8 9 10 11 12 13 14 15 16 17 18 19 20 21 22 23 24 25 26 27 28 29 30 private void UpdateGeometry (){ if (!shouldHideMobileInput) return ; if (m_CachedInputRenderer == null && m_TextComponent != null ) { GameObject go = new GameObject(transform.name + " Input Caret" , typeof (RectTransform), typeof (CanvasRenderer)); go.hideFlags = HideFlags.DontSave; go.transform.SetParent(m_TextComponent.transform.parent); go.transform.SetAsFirstSibling(); go.layer = gameObject.layer; caretRectTrans = go.GetComponent<RectTransform>(); m_CachedInputRenderer = go.GetComponent<CanvasRenderer>(); m_CachedInputRenderer.SetMaterial(m_TextComponent.GetModifiedMaterial(Graphic.defaultGraphicMaterial), Texture2D.whiteTexture); go.AddComponent<LayoutElement>().ignoreLayout = true ; AssignPositioningIfNeeded(); } if (m_CachedInputRenderer == null ) return ; OnFillVBO(mesh); m_CachedInputRenderer.SetMesh(mesh); }
在 UpdateGeometry() 中,确实只针对光标做了处理,这里可以看到代表光标的 gameObject 是动态生成的,并且在不需要显示的情况下不会生成。光标生成的具体逻辑在 OnFillVBO() 中。
1 2 3 4 5 private void UpdateCaretMaterial (){ if (m_TextComponent != null && m_CachedInputRenderer != null ) m_CachedInputRenderer.SetMaterial(m_TextComponent.GetModifiedMaterial(Graphic.defaultGraphicMaterial), Texture2D.whiteTexture); }
UpdateCaretMaterial() 也是类似的,只是在材质更新时重新设置了光标的材质。
UpdateLabelUpdateLabel() 也是在 Text 组件的几何信息更新时注册的回调,主要作用是将用户输入的内容赋给 m_TextComponent.Text。
1 2 3 4 5 6 7 8 9 10 11 12 13 14 15 16 17 18 19 20 21 22 23 24 25 26 27 28 29 30 31 32 33 34 35 36 37 38 39 40 41 42 43 44 45 46 47 48 49 50 protected void UpdateLabel (){ if (m_TextComponent != null && m_TextComponent.font != null && !m_PreventFontCallback) { m_PreventFontCallback = true ; string fullText; if (compositionString.Length > 0 ) fullText = text.Substring(0 , m_CaretPosition) + compositionString + text.Substring(m_CaretPosition); else fullText = text; string processed; if (inputType == InputType.Password) processed = new string (asteriskChar, fullText.Length); else processed = fullText; bool isEmpty = string .IsNullOrEmpty(fullText); if (m_Placeholder != null ) m_Placeholder.enabled = isEmpty; if (!m_AllowInput) { m_DrawStart = 0 ; m_DrawEnd = m_Text.Length; } if (!isEmpty) { Vector2 extents = m_TextComponent.rectTransform.rect.size; var settings = m_TextComponent.GetGenerationSettings(extents); settings.generateOutOfBounds = true ; cachedInputTextGenerator.PopulateWithErrors(processed, settings, gameObject); SetDrawRangeToContainCaretPosition(caretSelectPositionInternal); processed = processed.Substring(m_DrawStart, Mathf.Min(m_DrawEnd, processed.Length) - m_DrawStart); SetCaretVisible(); } m_TextComponent.text = processed; MarkGeometryAsDirty(); m_PreventFontCallback = false ; } }
该函数的主要逻辑就是处理各种输入情况,得到 processed 字符串后赋给 m_TextComponent.text。文本内容本身的重建操作则由 Text 组件负责。
有一点需要注意的地方,在 UpdateLabel() 函数体内部将 Text.m_PreventFontCallback 设置为 true,从而阻止递归地调用,避免死循环。在处理完成后会再将其设置为 false。
OnDisable1 2 3 4 5 6 7 8 9 10 11 12 13 14 15 16 17 18 19 20 21 22 23 24 protected override void OnDisable (){ m_BlinkCoroutine = null ; DeactivateInputField(); if (m_TextComponent != null ) { m_TextComponent.UnregisterDirtyVerticesCallback(MarkGeometryAsDirty); m_TextComponent.UnregisterDirtyVerticesCallback(UpdateLabel); m_TextComponent.UnregisterDirtyMaterialCallback(UpdateCaretMaterial); } CanvasUpdateRegistry.UnRegisterCanvasElementForRebuild(this ); if (m_CachedInputRenderer != null ) m_CachedInputRenderer.Clear(); if (m_Mesh != null ) DestroyImmediate(m_Mesh); m_Mesh = null ; base .OnDisable(); }
OnDisable() 几乎就是 OnEnable() 相反的操作,主要是注销了一些回调函数以及清理了一些资源。
1 2 3 4 5 6 7 8 9 10 11 12 13 14 15 16 17 18 19 20 21 22 23 24 25 26 27 28 29 30 31 32 public void DeactivateInputField (){ if (!m_AllowInput) return ; m_HasDoneFocusTransition = false ; m_AllowInput = false ; if (m_Placeholder != null ) m_Placeholder.enabled = string .IsNullOrEmpty(m_Text); if (m_TextComponent != null && IsInteractable()) { if (m_WasCanceled) text = m_OriginalText; SendOnSubmit(); if (m_Keyboard != null ) { m_Keyboard.active = false ; m_Keyboard = null ; } m_CaretPosition = m_CaretSelectPosition = 0 ; input.imeCompositionMode = IMECompositionMode.Auto; } MarkGeometryAsDirty(); }
DeactivateInputField() 主要是用于取消激活状态,清理一些状态以及触发相应的回调。
1 2 3 4 5 6 protected void SendOnSubmit (){ UISystemProfilerApi.AddMarker("InputField.onSubmit" , this ); if (onEndEdit != null ) onEndEdit.Invoke(m_Text); }
即用户注册进 onEndEdit 的回调函数。
LateUpdateInputField 在 LateUpdate() 中处理用户的输入逻辑,即每一帧都会检查用户的输入情况,验证输入的有效性,并更新文本内容等;当用户停止输入时也会触发相应的回调。
点击展开代码
1 2 3 4 5 6 7 8 9 10 11 12 13 14 15 16 17 18 19 20 21 22 23 24 25 26 27 28 29 30 31 32 33 34 35 36 37 38 39 40 41 42 43 44 45 46 47 48 49 50 51 52 53 54 55 56 57 58 59 60 61 62 63 64 65 66 67 68 69 70 71 72 73 74 75 76 77 78 79 80 81 82 83 84 85 86 87 88 89 90 91 92 93 94 95 96 97 98 99 100 101 102 103 104 105 106 107 108 109 110 protected virtual void LateUpdate (){ if (m_ShouldActivateNextUpdate) { if (!isFocused) { ActivateInputFieldInternal(); m_ShouldActivateNextUpdate = false ; return ; } m_ShouldActivateNextUpdate = false ; } AssignPositioningIfNeeded(); if (!isFocused || InPlaceEditing()) return ; if (m_Keyboard == null || m_Keyboard.status != TouchScreenKeyboard.Status.Visible) { if (m_Keyboard != null ) { if (!m_ReadOnly) text = m_Keyboard.text; if (m_Keyboard.status == TouchScreenKeyboard.Status.Canceled) m_WasCanceled = true ; } OnDeselect(null ); return ; } string val = m_Keyboard.text; if (m_Text != val) { if (m_ReadOnly) { m_Keyboard.text = m_Text; } else { m_Text = "" ; for (int i = 0 ; i < val.Length; ++i) { char c = val[i]; if (c == '\r' || (int )c == 3 ) c = '\n' ; if (onValidateInput != null ) c = onValidateInput(m_Text, m_Text.Length, c); else if (characterValidation != CharacterValidation.None) c = Validate(m_Text, m_Text.Length, c); if (lineType == LineType.MultiLineSubmit && c == '\n' ) { m_Keyboard.text = m_Text; OnDeselect(null ); return ; } if (c != 0 ) m_Text += c; } if (characterLimit > 0 && m_Text.Length > characterLimit) m_Text = m_Text.Substring(0 , characterLimit); if (m_Keyboard.canGetSelection) { UpdateCaretFromKeyboard(); } else { caretPositionInternal = caretSelectPositionInternal = m_Text.Length; } if (m_Text != val) m_Keyboard.text = m_Text; SendOnValueChangedAndUpdateLabel(); } } else if (m_HideMobileInput && m_Keyboard.canSetSelection) { m_Keyboard.selection = new RangeInt(caretPositionInternal, caretSelectPositionInternal - caretPositionInternal); } else if (m_Keyboard.canGetSelection && !m_HideMobileInput) { UpdateCaretFromKeyboard(); } if (m_Keyboard.status != TouchScreenKeyboard.Status.Visible) { if (m_Keyboard.status == TouchScreenKeyboard.Status.Canceled) m_WasCanceled = true ; OnDeselect(null ); } }
函数的内容也比较繁琐,但是与事件处理相关的就只有两处:
SendOnValueChangedAndUpdateLabelLateUpdate() 在更新了 m_Text 后调用了 SendOnValueChangedAndUpdateLabel() 以更新文本内容及触发相应的回调。
1 2 3 4 5 6 7 8 9 10 11 12 private void SendOnValueChangedAndUpdateLabel (){ SendOnValueChanged(); UpdateLabel(); } private void SendOnValueChanged (){ UISystemProfilerApi.AddMarker("InputField.value" , this ); if (onValueChanged != null ) onValueChanged.Invoke(text); }
可以看到在 SendOnValueChangedAndUpdateLabel() 中,会调用 SendOnValueChanged() 函数以触发回调,同时调用 UpdateLabel() 函数以更新文本内容。
1 2 3 4 5 public class OnChangeEvent : UnityEvent <string > {}private OnChangeEvent m_OnValueChanged = new OnChangeEvent();public OnChangeEvent onValueChanged { get { return m_OnValueChanged; } set { SetPropertyUtility.SetClass(ref m_OnValueChanged, value ); } }
向 onValueChanged 中注册回调函数就能够实现在文本内容发生变化时触发相应的功能了。
OnDeselect该函数在用户停止输入时被调用,负责在用户停止输入时触发相应的回调。
1 2 3 4 5 public override void OnDeselect (BaseEventData eventData ){ DeactivateInputField(); base .OnDeselect(eventData); }
DeactivateInputField() 上文已经分析过,会触发 onEndEdit 中的函数。
InputField 的事件处理
InputField 本身实现了诸多事件处理接口,这些接口的实现也是 InputField 的核心逻辑之一。
OnPointerClickOnPointerClick() 是 IPointerClickHandler 接口的实现,用于处理鼠标点击事件。对于 InputField 来说,当鼠标左键点击时,会激活输入框。
1 2 3 4 5 6 7 public virtual void OnPointerClick (PointerEventData eventData ){ if (eventData.button != PointerEventData.InputButton.Left) return ; ActivateInputField(); }
1 2 3 4 5 6 7 8 9 10 11 12 13 14 15 16 17 public void ActivateInputField (){ if (m_TextComponent == null || m_TextComponent.font == null || !IsActive() || !IsInteractable()) return ; if (isFocused) { if (m_Keyboard != null && !m_Keyboard.active) { m_Keyboard.active = true ; m_Keyboard.text = m_Text; } } m_ShouldActivateNextUpdate = true ; }
InputField 中使用了Unity提供的键盘接口类型(TouchScreenKeyboard),该接口记录了我们的输入内容。到此,激活操作就结束了。主要内容是激活了TouchScreenKeyboard,来保存我们的输入。
OnSubmit1 2 3 4 5 6 7 8 public virtual void OnSubmit (BaseEventData eventData ){ if (!IsActive() || !IsInteractable()) return ; if (!isFocused) m_ShouldActivateNextUpdate = true ; }
可以看到,由于在 LateUpdate() 中已经处理了用户的输入逻辑,因此 OnSubmit() 中只是将 m_ShouldActivateNextUpdate 设置为 true,以在下一帧激活输入框。并没有做额外的回调函数等的处理。
OnBeginDrag & OnDrag & OnEndDrag这三个函数是 IBeginDragHandler、IDragHandler、IEndDragHandler 接口的实现,用于处理拖拽事件。对于 InputField 来说,拖拽事件主要是用于选中文本。
选中文本会进行高亮显示,并且随着拖动会有一个移动的动画效果,这些都是由 InputField 的拖拽事件处理函数实现的。
1 2 3 4 5 6 7 public virtual void OnBeginDrag (PointerEventData eventData ){ if (!MayDrag(eventData)) return ; m_UpdateDrag = true ; }
在 OnBeginDrag() 中,首先验证了时间状态,然后将 m_UpdateDrag 设置为 true,表示正处于拖拽状态中。
1 2 3 4 5 6 7 public virtual void OnEndDrag (PointerEventData eventData ){ if (!MayDrag(eventData)) return ; m_UpdateDrag = false ; }
OnEndDrag() 中则是相反的逻辑。
1 2 3 4 5 6 7 8 9 10 11 12 13 14 15 16 17 public virtual void OnDrag (PointerEventData eventData ){ if (!MayDrag(eventData)) return ; Vector2 localMousePos; RectTransformUtility.ScreenPointToLocalPointInRectangle(textComponent.rectTransform, eventData.position, eventData.pressEventCamera, out localMousePos); caretSelectPositionInternal = GetCharacterIndexFromPosition(localMousePos) + m_DrawStart; MarkGeometryAsDirty(); m_DragPositionOutOfBounds = !RectTransformUtility.RectangleContainsScreenPoint(textComponent.rectTransform, eventData.position, eventData.pressEventCamera); if (m_DragPositionOutOfBounds && m_DragCoroutine == null ) m_DragCoroutine = StartCoroutine(MouseDragOutsideRect(eventData)); eventData.Use(); }
在 OnDrag() 中,会根据鼠标所在位置更新 caretSelectPositionInternal,代表拖拽到的位置。同时在 OnPointerDown() 函数中会更新 caretPositionInternal 的值代表拖拽的起点位置 。有了这两个变量,就可以计算出选中的文本区域了。
除了计算拖拽区域外,OnDrag() 还负责一个动画效果的协程 MouseDragOutsideRect(),当拖拽区域超出显示范围就会移动文本,实现上图中的移动效果。
1 2 3 4 5 6 7 8 9 10 11 12 13 14 15 16 17 18 19 20 21 22 23 24 25 26 27 28 29 30 31 32 33 IEnumerator MouseDragOutsideRect (PointerEventData eventData ) { while (m_UpdateDrag && m_DragPositionOutOfBounds) { Vector2 localMousePos; RectTransformUtility.ScreenPointToLocalPointInRectangle(textComponent.rectTransform, eventData.position, eventData.pressEventCamera, out localMousePos); Rect rect = textComponent.rectTransform.rect; if (multiLine) { if (localMousePos.y > rect.yMax) MoveUp(true , true ); else if (localMousePos.y < rect.yMin) MoveDown(true , true ); } else { if (localMousePos.x < rect.xMin) MoveLeft(true , false ); else if (localMousePos.x > rect.xMax) MoveRight(true , false ); } UpdateLabel(); float delay = multiLine ? kVScrollSpeed : kHScrollSpeed; if (m_WaitForSecondsRealtime == null ) m_WaitForSecondsRealtime = new WaitForSecondsRealtime(delay); else m_WaitForSecondsRealtime.waitTime = delay; yield return m_WaitForSecondsRealtime; } m_DragCoroutine = null ; }
该协程函数的逻辑就是根据鼠标位置的变化来移动文本,实现拖拽时文本的移动效果。包含了水平和垂直两种情况。具体的逻辑我们不再深究。
现在我们计算出了拖拽区域,又实现了动画效果,那么高亮显示的逻辑是在哪里实现的呢?
实际上就在 GenerateHighlight() 函数中。
1 2 3 4 5 6 7 8 9 10 11 12 13 14 15 16 17 18 19 20 21 22 23 24 25 26 27 28 29 30 31 32 33 34 35 36 private void GenerateHighlight (VertexHelper vbo, Vector2 roundingOffset ){ int startChar = Mathf.Max(0 , caretPositionInternal - m_DrawStart); int endChar = Mathf.Max(0 , caretSelectPositionInternal - m_DrawStart); if (startChar > endChar) { int temp = startChar; startChar = endChar; endChar = temp; } endChar -= 1 ; TextGenerator gen = m_TextComponent.cachedTextGenerator; if (gen.lineCount <= 0 ) return ; int currentLineIndex = DetermineCharacterLine(startChar, gen); int lastCharInLineIndex = GetLineEndPosition(gen, currentLineIndex); UIVertex vert = UIVertex.simpleVert; vert.uv0 = Vector2.zero; vert.color = selectionColor; int currentChar = startChar; while (currentChar <= endChar && currentChar < gen.characterCount) { currentChar++; } }
这里省略了部分代码,但可以看到在函数的起始位置分别通过 caretPositionInternal 和 caretSelectPositionInternal 计算出了 startChar 和 endChar,即选中的文本区域。然后生成顶点并填充至 vbo 中。
至于函数的调用链,GenerateHighlight() 会由 OnFillVBO() 调用,最终被 UpdateGeometry() 调用以将生成的网格全部提交给 CanvasRenderer。